


Tip : Sometimes your course appears as "Private", This happens while creating course an instructor set the course as a paid course and not associate any product with it.
Instructor Guide
Role
-
Instructor :
- An Instructor by default gets access to a lot of features in the sites. Like viewing all Questions in the question bank, viewing all units in the directory through the administartor panel.
- Note :Instructor however can not edit or delete the contents from Units created by other Instructors.
- An Instructor can not manually assign badges and certificates to students who are not taking the course.
- Once a user is registered on the site, the WPLMS (or any BuddyPress site) would not acknowledge it unless he/she logs in the site. Once the user is logged in, it will start appearing in the user's directory (To appear in user's directory). So for WPLMS to recognise the user as a student, the user must login to the site at least once.
-
Group Administrator :
- An instructor is also the Group Admin of the groups connected to Courses published by him.
- An Instructor therefore can Add or Remove any student from the Group. An Instructor can also assign some students as Group Moderators for efficient functioning of the group.
-
Forum Administrator :
- Just like the groups, an Instructor is the Forum administrator for the Forum Connected to the Course.
- An Instructor can delete any sub-forum, topic in the Course forum.
- An Instructor can ban any user in his/her forum.
LMS
-
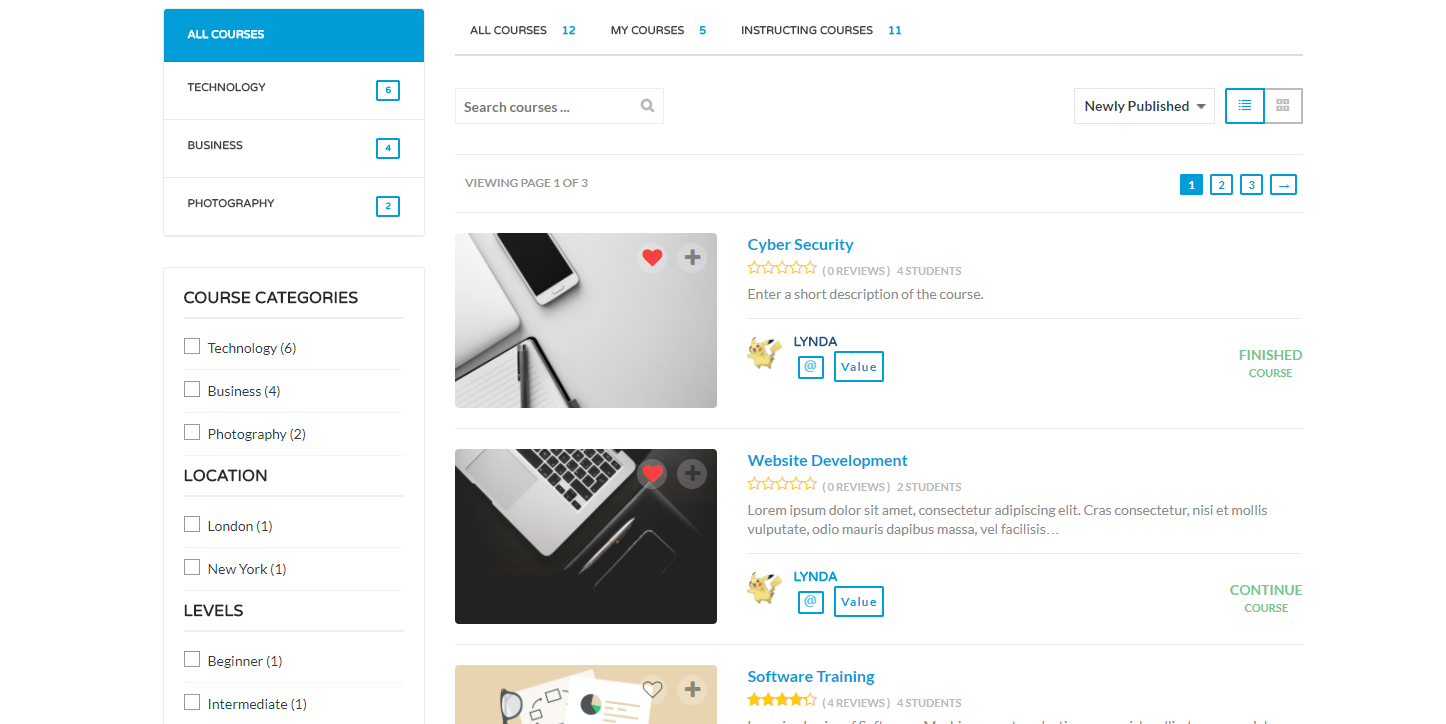
All Courses: A course is a unit of teaching that typically lasts one academic term, is led by one or more instructors (teachers or professors), and has a fixed roster of students. A course is usually an individual subject. This section in LMS consists all the imported courses. You can delete these courses and create a new one.
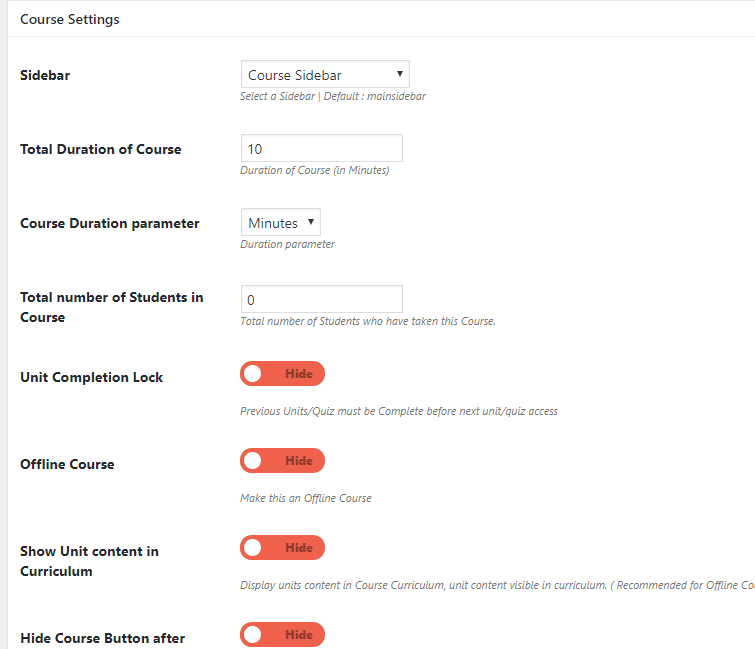
- Sidebar: Select the sidebar you want to display on this course page
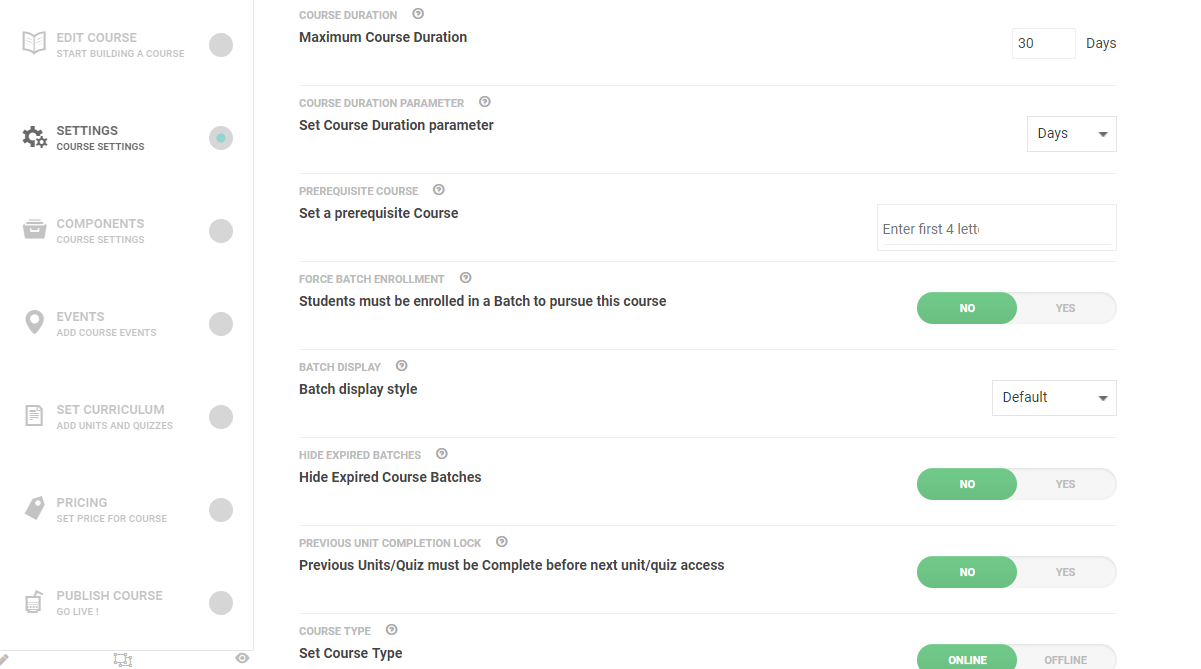
- Total Duration of Course: Set the duration of course
- Course Duration Parameter: Parameter like days, hours, minutes
- Total number of Students in Course: Total number of students who have taken this course
- Unit Completion Lock: Enabling this restrict all the users to complete the previous unit/quiz before accessing the next one
- Offline Course: Makes this course to be available offline
- Show Unit Content in Curriculum: If the course is offline then it will show the unit content in the course curriculum.
- Hide Course Button After Subscription: Hide Start Course/Continue Course button after Course is subscribed by user. ( Recommended for Offline Courses)
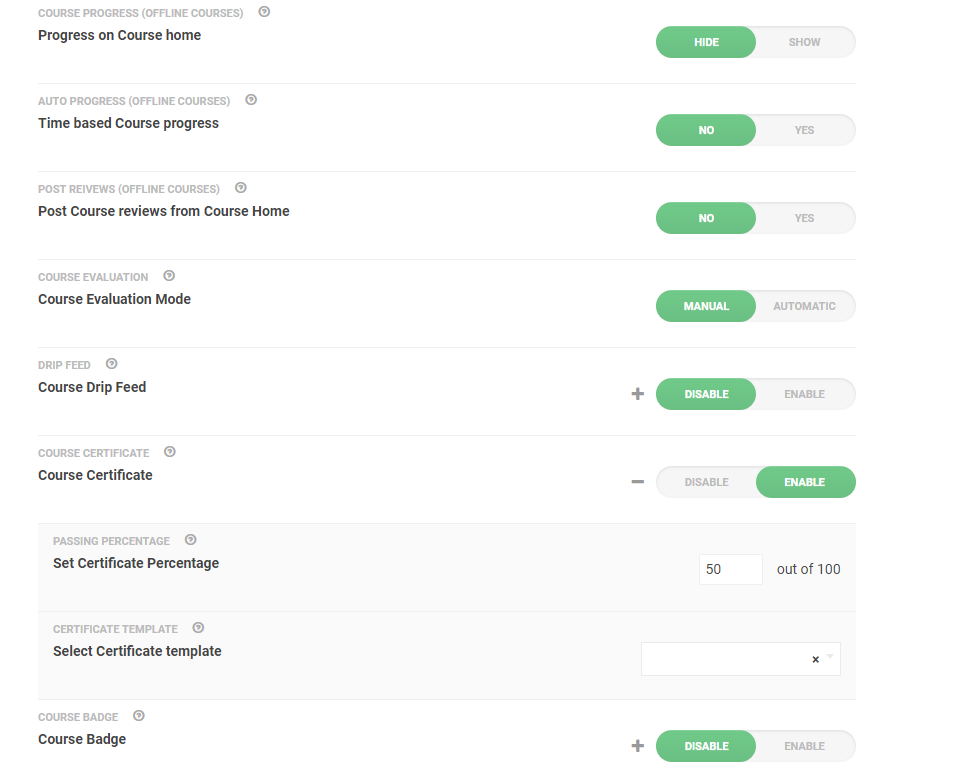
- Display Course Progress on Course Home: Display User Course progress on Course page.
- Time Based Course Progress: Automatically generate course progress based on duration (number of months/weeks/days/hours) passed in course.
- Post Course Reviews from Course Home: Allow subscribed users to post Course reviews from Course home page.
- Auto Evaluation: This will evalaute the course automatically just after finishing the course.
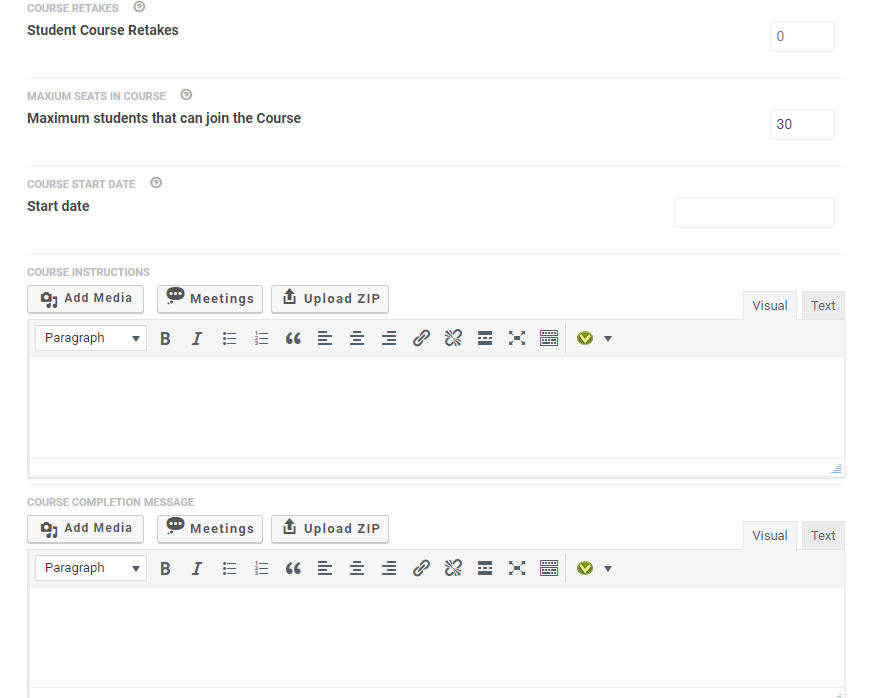
- Course Start Date: Date from which course begins
- Maximum Students in Course: Maximum number of students who can pursue the course at a time.
- Excellence Badge: Upload the image of the badge
- Badge Percentage: Set percentage to earn the badge
- Badge Title: When hover on the badge this will be shown as a title
- Completion Certificate: Enable Certificate image which Students receive upon course completion
- Certificate Template: Set a certificate template for the certificates of this course
- Passing Percentage: Set the course Passing Percentage
- Drip Feed: A course instructor can set duration between two successive course elements such as sections and units
- Course Starting Time as Drip Feed Origin:Tells us the starting point for drip feed, that is the previous unit or the course start point. Drip feed Origin
- Section Drip Feed: It will enable the section drip feed
- Drip Duration as Unit Duration: Set Duration between two consecutive units
- Drip Feed Duration (Static): This is the duration between consecutive Drip feed units (in Days )
- Drip Duration parameter: Select the duration parameter of th drip feed
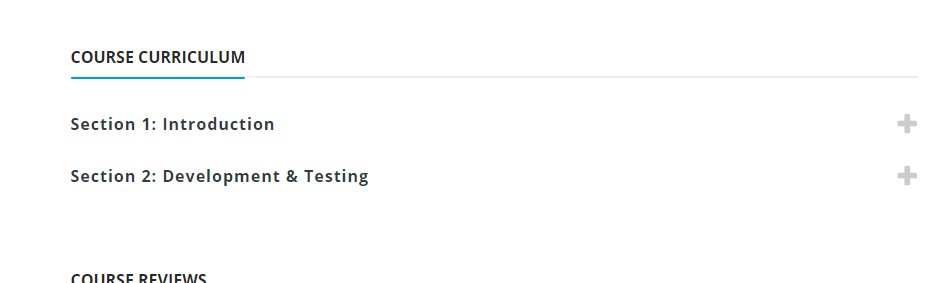
- Course Curriculum: Set the cuuriculum for the course
- Prerequisite Course: The course which is required before pursuing this coursee
- Course Retakes: Number of retakes a user can in a course(not applicable for administrator)
- Course Forum: Connect Forum with Course
- Course Group:Connect Forum With Group
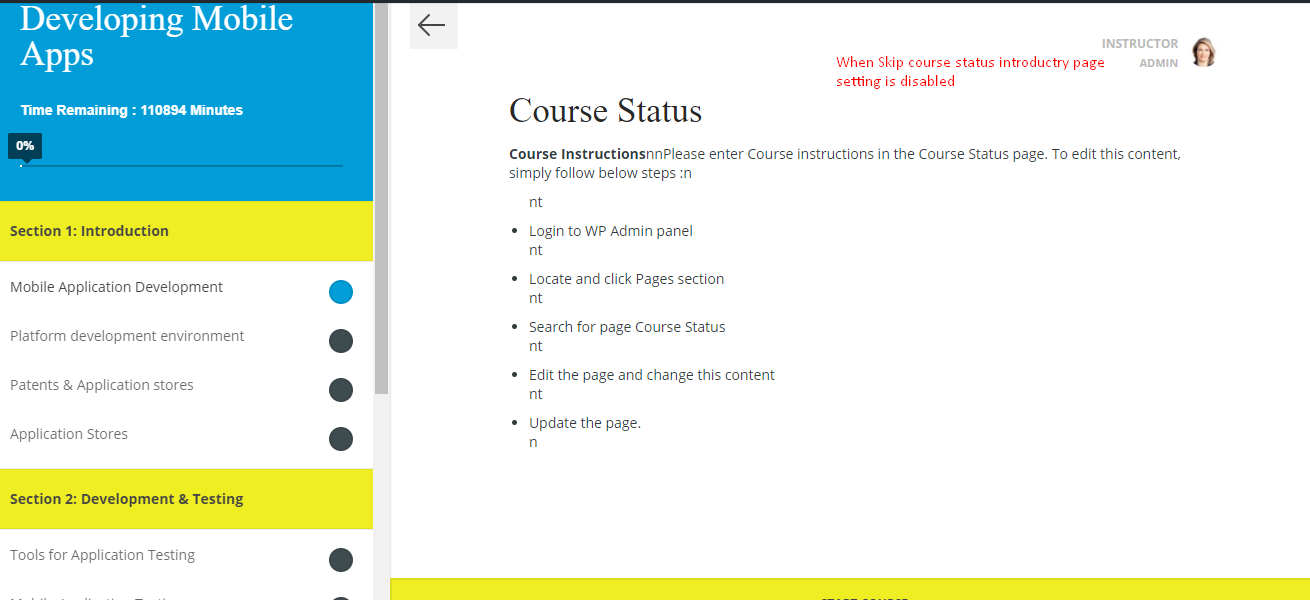
- Course specific instructions: Course specific instructions which would be shown in the Start course/Course status page
- Course Completion Message: This message is shown to users when they Finish submit the course
- Force Batch enrollment: Students must be enrolled in a Batch to pursue this course
- Batch Display: Select the batch display style
- Hide Expired Batches: Hide expired batches from course page
- Free Course: Enabling this switch will make this a free course
- Make First Section Free:Allow users to only see first section for free.
- Apply For Course:Students are required to Apply for course and instructor would manually approve them to course. Do not enable "Free" course with this setting.
- Associated Product:Associate a woocommerce product with this course
Course Settings:
- All Units: A unit is like a semester or you can say a unit divides a whole course into small subunits. An instructor can set timing for units that wen it will be available to students. This section consists all the imported course units.
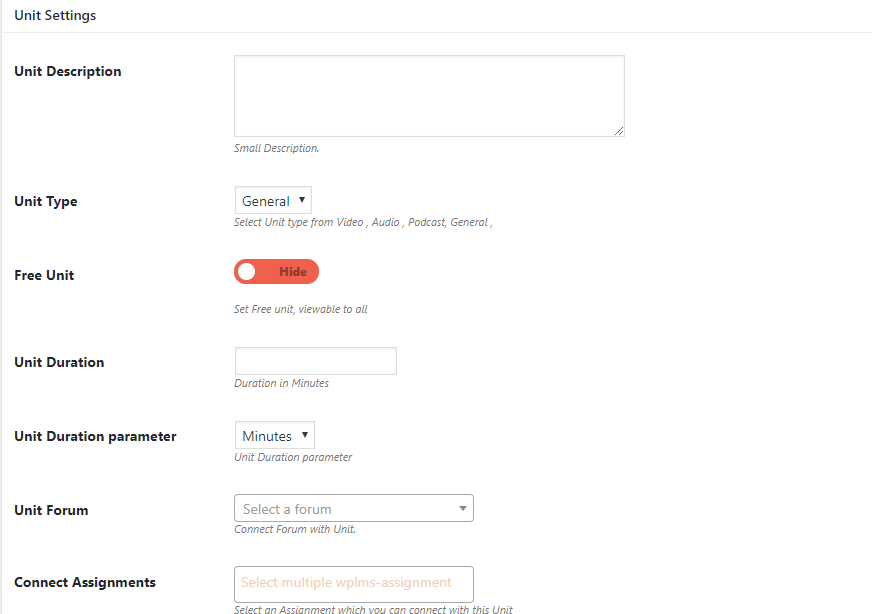
- Unit Description: Describe your unit in a few lines
- Unit Type: Select Unit type from Video , Audio , Podcast, General
- Free Unit: After enabling this switch, this unit will be viewable to all
- Unit Duraton:Define the duration of that unit
- Unit duration Parameter:Measures the time duration(minutes, seconds etc)
- Unit Forums:You can connect any forum with unit
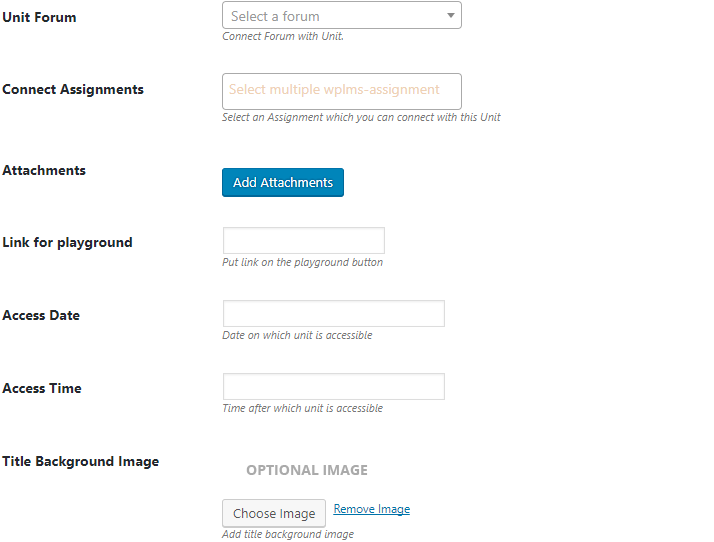
- Connect Assignments:Select an Assignment which you can connect with this Unit
- Attachments: Can attach images, audio, videos which you want to be downloaded by the user(which is used in this unit)
- Title background image:You can set unit specific title background. (if you have selected transparent header style from wp-admin >> appearance >> customize >> header >> header style.)
Unit Settings:
All Quizes:
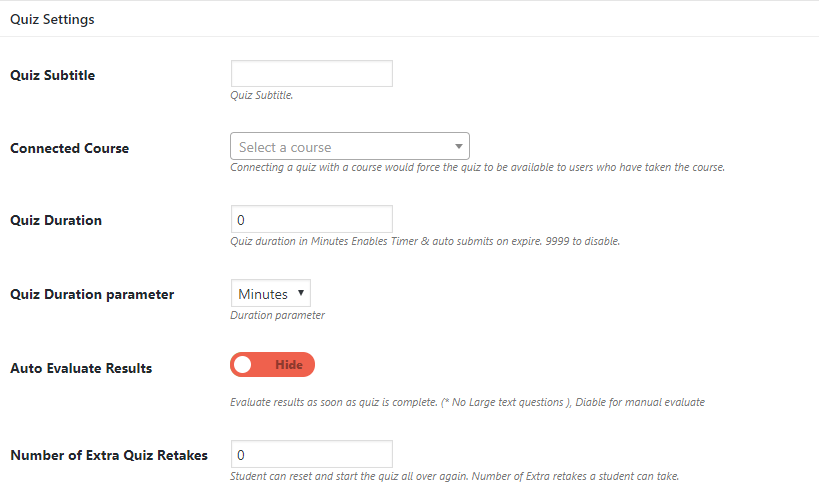
A quiz is a brief assessment used in education and similar fields to measure growth in knowledge, abilities, and/or skills. Quizzes are usually scored in points. In wplms, an instructor can create quizzes and attach those quizzes for the assessment of those students who are enrolled in that course.- Quiz Subtitle: Add the subtitle of your quiz
- Connected Course: Connect the course to include this quiz
- Quiz Duration: Set the duration for the quiz. After the duration expires it will automatically get submitted
- Quiz Duration Parameter: Set Parameter of the quiz duration(Seconds, minutes, hours, Days, Years).
- Auto Evaluate Results: Evaluate results as soon as quiz is complete.(Disable this when you want to calculate results manually)
- Number of Extra Quiz Retakes: Set the number of retakes a student is allowed to take
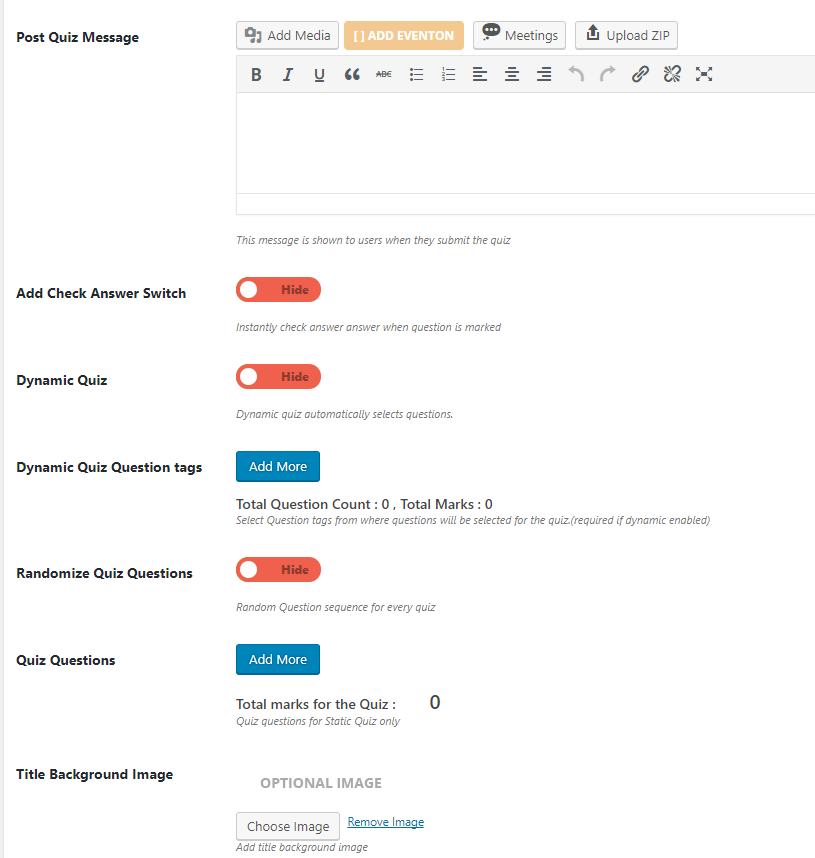
- Post Quiz Message: This message is shown to users when they submit the quiz
- Show Results After Submission: This settings allows users to get thier results after submission of quiz.
- Add Check Answer Switch: Instantly check answer answer when question is marked
- Dynamic Quiz: Dynamic quiz automatically selects questions.
- Dynamic Quiz Question Tags: Select Question tags from where questions will be selected for the quiz.(required if dynamic enabled). On the basis of question tags, it will choose the questions to be appear in the quiz
- Randomize Quiz Questions: No need to set the questions. Select questions randomly from the question tags
- Quiz Questions: (When random is disabled)Set the quiz questions you want to appear in this quiz
Quiz Settings:
- All Questions: Question Bank as the name suggests, it is a collection of different types of questions. WPLMS Supports 10 types of questions: True-False, Multiple Choice, Multiple Correct, Soort Answers, Match Answers, Fill in the Blank, DropDown Select, Small Text, Large Text, Survey Type
- Question Type: Select your question type(multiple choice, true or false etc).
- Question Options:Set the options for questions.
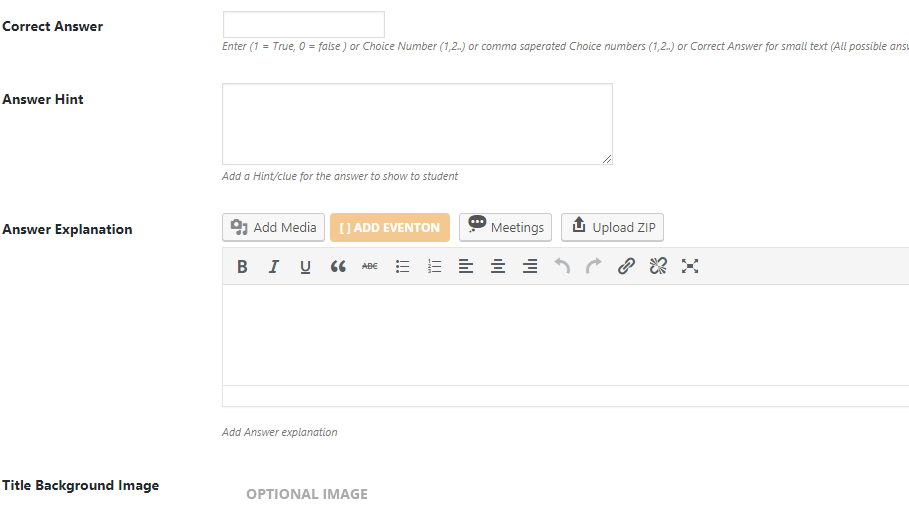
- Correct Answer: Enter choice number which is correct(0 for no answer which needs manual checking).
- Answer Hint:Add a Hint/clue for the answer to show to student
- Answer Explanation:Add the explanation for your answer
Question Settings:
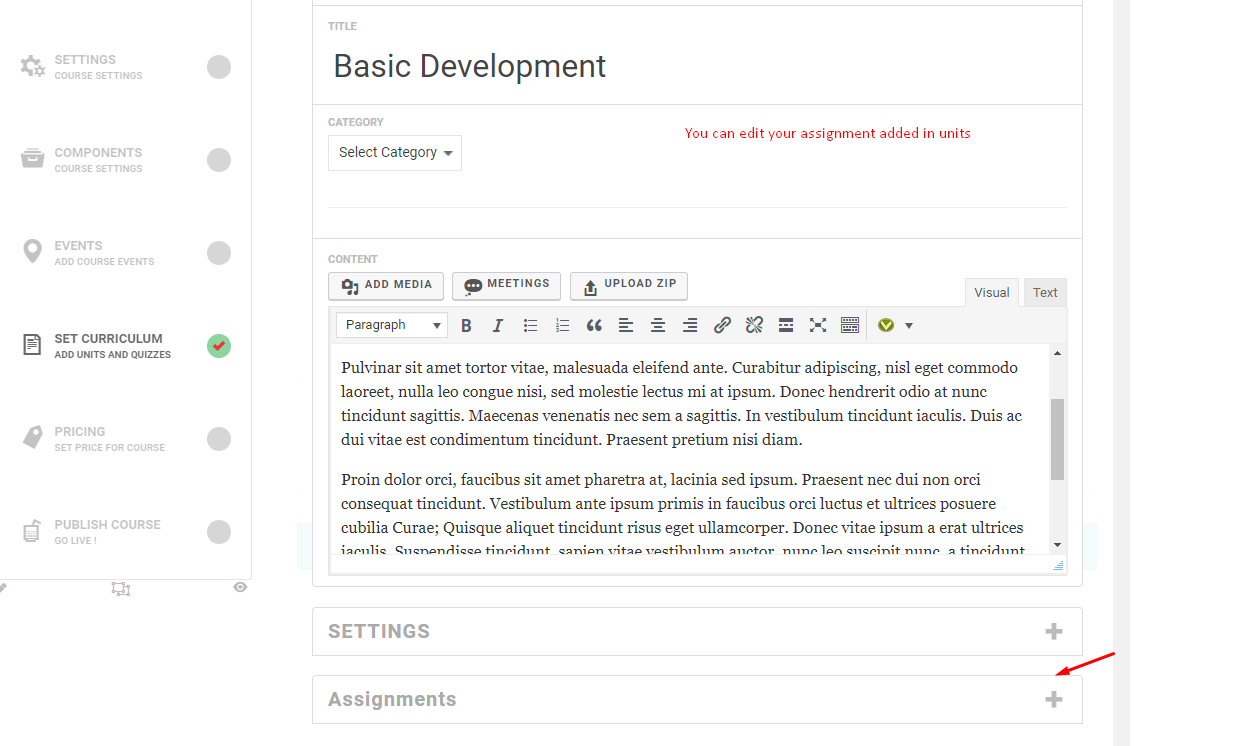
- All Assignments: An assignment is a task or piece of work that you are given to do, especially as part of your job or studies.
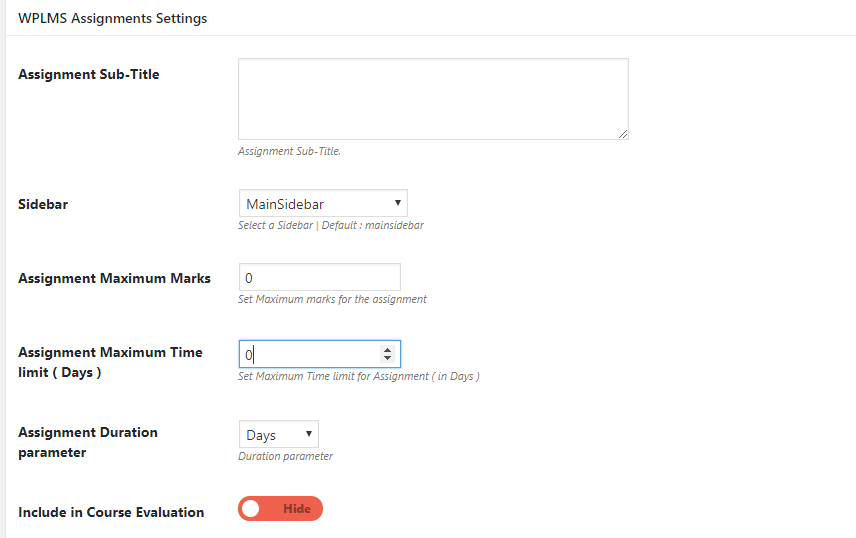
- Assignment Sub-Title: Set the subtitle for your assignment
- Sidebar: Select the sidebar which will appear on the assignment page
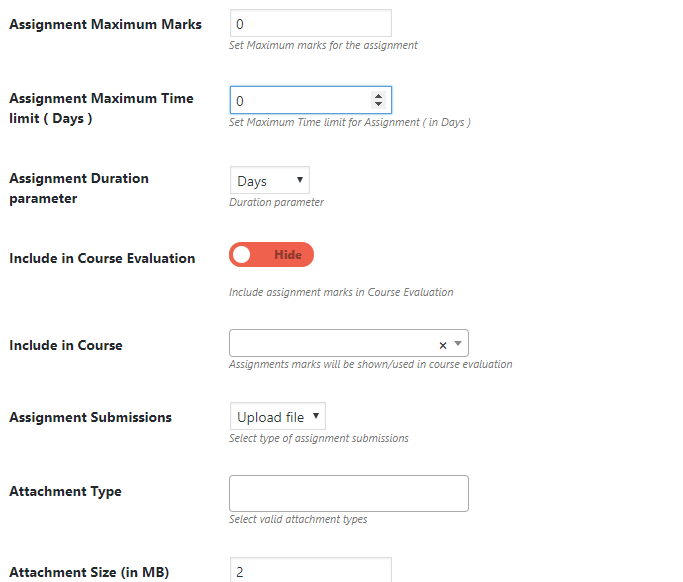
- Assignment Maximum Marks: Set the marks for this assignment
- Assignment Maximum Time Limit: maimum Time Limit upto which a student can submit the assignment
- Assignment Duation Parameter:Set the duration parameter for the assignment
- Include in Course Evaluation:Enabling the switch will include assignment marks in course evaluation
- Include in Course: Assignment marks will be included in course evaluation
- Assignment Submissions:There are two options either you can upload a file or submit your assignment in written by selecting textarea here
- Attachment Type:types of attachment which will be valid during submission
- Attachment Size(in mb): Set the size of attachment type. greater than this will not be submitted
Assignment Settings:
- Course News: Using this section you can also add course related news in your courses. How to display Course News
- Payouts: This section is for instructor commissions.It shows the payouts that an admininstrator have to pay to the instructors in different courses.
- Certificate Templates: Instructors and Administrators can create their own certificate templates which is used for certificates and set these templates for the certificates. Create Certificate Template
- Certificate Template Settings:
- Background Image/Pattern:Add a background image for your certificate template
- Enable Print & PDF:Displays a Print and Download as PDF Button on top right corner of certificate
- Certificate Width:Add Certificate Width
- Certificate Height: Add Certificate Height
- Custom Class: Add Custom Class over Certificate container
- Custom CSS: Add Custom CSS to customized your certificate font size, font weight etc.
- Statistics: statistics deals with the collection, analysis, interpretation, and presentation of masses of numerical data.
Read More About Statistics: Link - LMS Tree: Lms Tree is the tree which display course as the Branch and units and assignment as the sub-branches.Lms tree helps in viewing and editing all your courses and associated units and assignemnt through one place. Refer the tutorial :LMS Tree in wplms
- Add Ons: As the name suggests it adds something. In wplms, Addons are available which extends the functionality of a plugin. This will integrates the plugin with the wplms theme such as WPLMS Woocommerce, WPLMS CoAuthors Plus.
- Course Navigation(when wplms course custom nav plugin is activated):
First of all please note that the hide show course settings feature will work for instructors only. Administrator will see all the settings always. There are two settings screens in this plugin. One is for Custom course section and other for Course creation settings (hide/show).
-
Custom Sections : Just Click on Add Custom Section. It will show a form to add a section which will have 5 settings namely:
- Add Section Title : Add Title for the section.
- Add Section Slug : For the slug and permalink settings. This must be unique and does not contain any spaces.
- Add Section Description : Add Description for the section.
- Select Courses : In which courses it should be visible.
- Select Section Visibility : Set section visibility to make that section visible for specific group of users.
Imp note : Please do not forget to re-save permalinks after each section you save by clicking on save section button.
- Front end course creation : This screen will show the show,hide and defaults values for the course settings that you will hide. There are some settings for which defaults are not available as they can be saved as blank.
Imp Note : Please note that if any settings are added or removed in course then please re-save the hide/show settings again as more settings can be added to the course by using this tip. It is necessary that if you hide any settings you must provide default value in it to avoid any conflicts.
-
Custom Sections : Just Click on Add Custom Section. It will show a form to add a section which will have 5 settings namely:
- Course Category: Here, you can define categories for your courses. From your courses you can categorize the courses. To create Course category, Go to Lms->Course category->Add New Course category.
- Quiz Type: Here, you can define types of a quiz for your courses unit. An administrator or instructor can add new categories for quizzes.
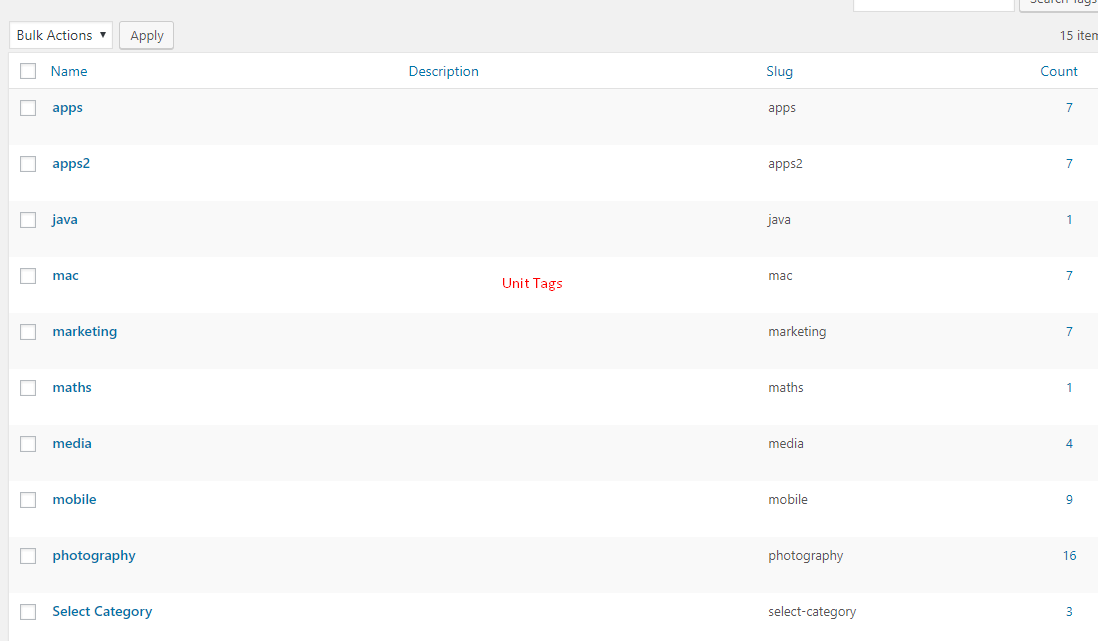
- Unit Tag: Unit tags helps in creating tags for your courses unit. Go to Lms->Unit Tag->Add New Tag.
- Level:
To enable level taxonomy, go to Vibe Options Panel > course manager > Enable Level Level. Level Taxonomy helps in creating levels and sub levels in courses.
- Enable levels: Go to Vibe option panel->course manager->Enable levels.
- Go to Lms->Levels->Add new levels
- Select parent for creating sub level.
- Go to the course and select level for the course.
- Go To Appearance->widgets->Buddypress and add buddypress course filter widget and checked the checkbox of show level filter and save.
- Filter courses based on levels in course directory.
- See the level in course detail area. Resave your permalinks.
- Location:
Location Taxonomy helps in locating course location. To Enable Course Location, Go to Vibe option panel->course manager->Enable Course Location.
- Go to Lms->Locations->Add new locations
- In your courses, you can select the course location
LMS Settings
LMS Setting allows administrator to redirect instructor and student to a particular page, set commission for the instructor, paying commissions according to the time period, ad-hoc management, import/export WPLMS elements.
LMS : General Settings
LMS General settings control the redirection as well as allows you to display or hide the members, curriculum, user progress etc. from the different sections of the page.also helps in limiting no. of course, units and quiz per instructor. Functions that are given in general settings are:
-
General Settings
User Login & Registration Settings
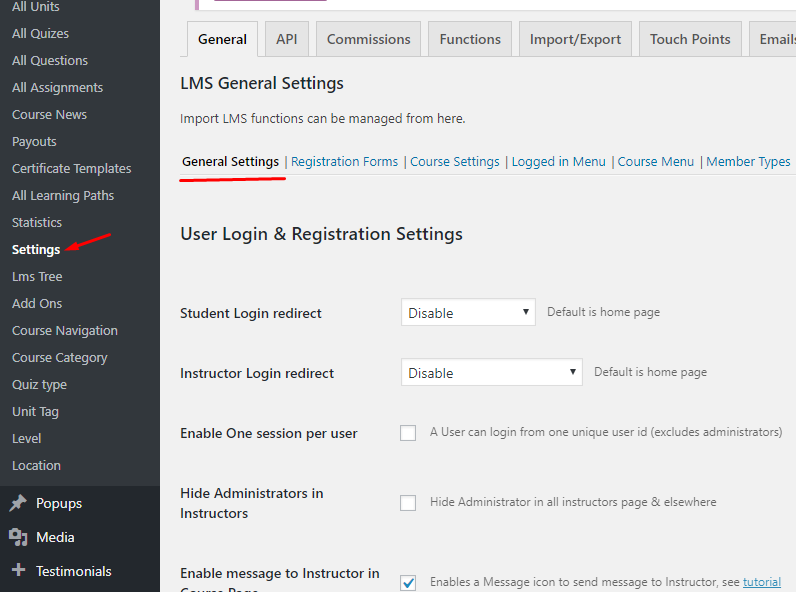
- Student Login redirect : A dropdown containing pages: Home Page, Profile Page, My Courses Page, Dashboard Page, Same Page. By default student redirection is set to home page but by choosing one from the dropdown you can redirect student to a different page as he log-in.
- Instructor Login redirect : A dropdown containing pages: Home Page, Profile Page, My Courses Page, Dashboard Page, Same Page. By default instructor redirection is set to home page but by choosing one from the dropdown you can redirect an instructor to a different page as he log-in.
- Enable One Session Per User : WordPress introduced session management classes/functions/hooks.You can locate the “Logout of all other sessions” button your user profile in WP admin panel, click this button and you’ll be logged out of all other sessions. Other sessions would mean that you logged in from another computer, mobile phone/app etc. If you checked the checkbox then it will allow a user can login from one unique user_id(EXCLUDES ADMINISTRATORS).
- Hide Administrators in Instructors : This setting will hide administrator in all instructors page and elsewhere.
- Enable message to Instructor in Course Page : If you checked the checkbox then it will enables a message icon to send message to instructor. To send messages, first enable the private message from settings > BuddyPress > Components > Private Messaging. Tutorial
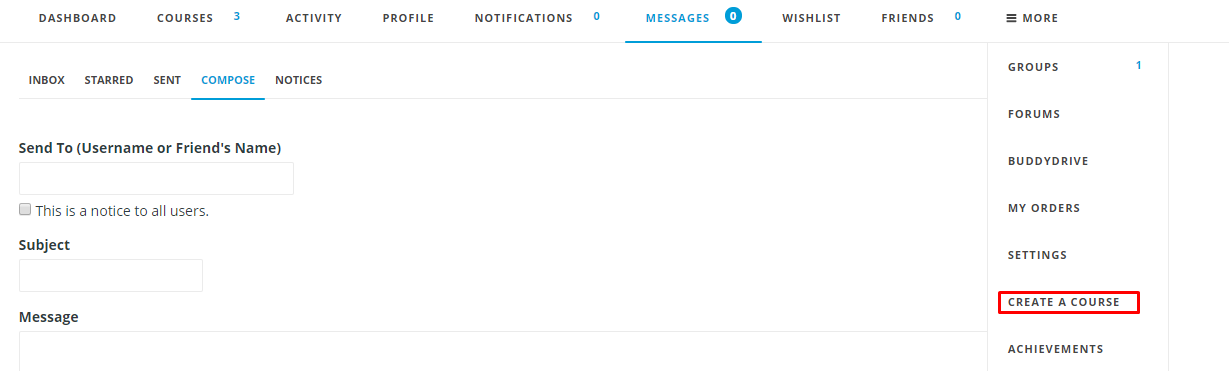
- Enable Create course button in instructor profile menu : It will add a create course button in the instructor profile menu.
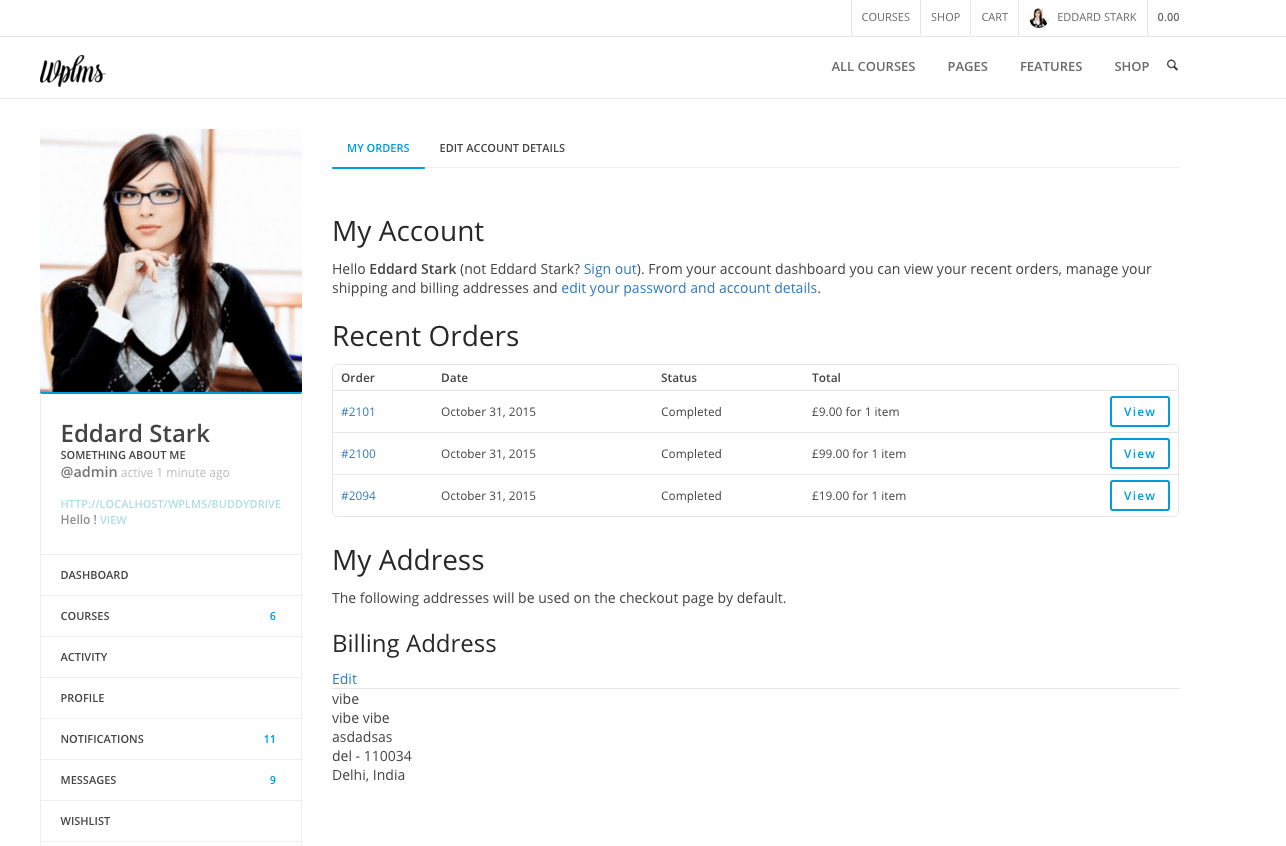
- Show WooCommerce/Pmpro account in profile : It will display woocommerce account in profile. Now, WooCommerce account would be manageable directly from BuddyPress profile section.
- Set a terms and conditions page for BuddyPress registration : You can select any page from your website which should be the terms and conditions page in the buddypress registration page.
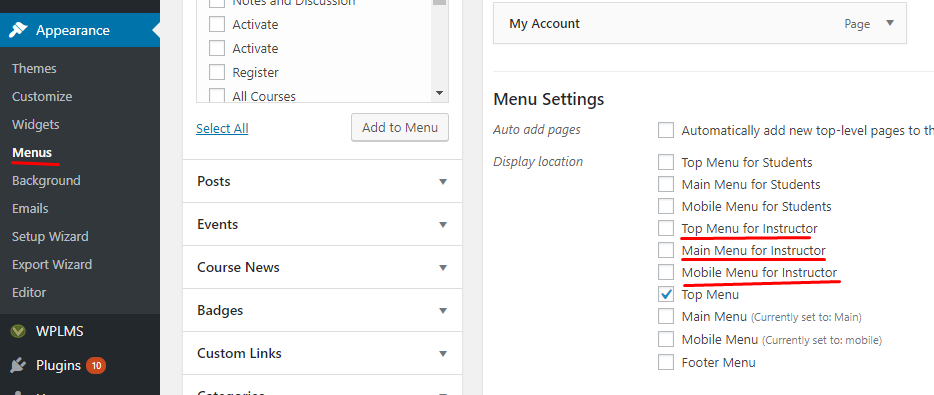
- Enable Student menus :If you checked the checkbox then it adds new menu locations for students. Menu will be visible when user logged in as Student.
- Enable Instructor menus :If you checked the checkbox then it adds new menu locations for instructors. Menu will be visible when user logged in as instructor.
- Assign Free courses to students on account activation : It enables auto-subscription to all the "free" courses in site to students when they signup/register and activate their account.
Course Home Settings
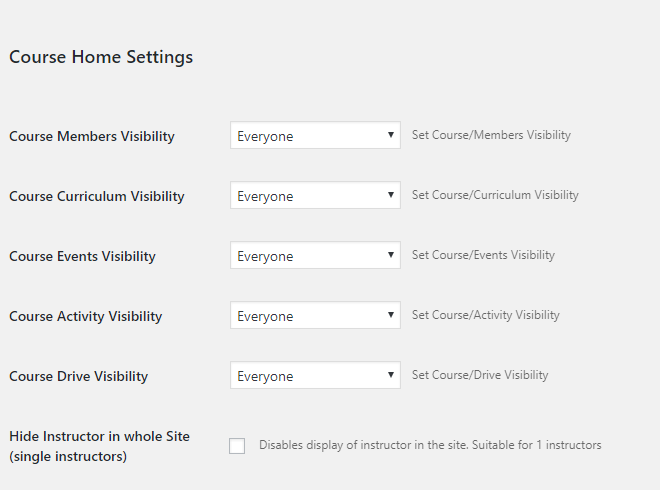
- Course Members Visibility : A dropdown contains options for Everyone, Logged In Users, Course Users, Instructors and Administrators. By default course members visibility is set to everyone. But you can choose who should see the course members, the logged in users or course users or just the instructors and the administrators of the website.
- Course Curriculum Visibility : A dropdown contains options for Everyone, Logged In Users, Course Users, Instructors and Administrators. By default course curriculum visibility is set to everyone. But you can choose who should see the course curriculum, the logged in users or course users or just the instructors and the administrators of the website.
- Course Events Visibility : A dropdown contains options for Everyone, Logged In Users, Course Users, Instructors and Administrators. By default course events visibility is set to everyone. But you can choose who should see the course events, the logged in users or course users or just the instructors and the admin of the website.
- Course Activity Visibility : A dropdown contains options for Everyone, Logged In Users, Course Users, Instructors and Admins. By default course activity visibility is set to everyone. But you can choose who should see the course activity, the logged in users or course users or just the instructors and the admin of the website.
- Course Drive Visibility : A dropdown contains options for Everyone, Logged In Users, Course Users, Instructors and Admins. By default course drive visibility is set to everyone. But you can choose who should see the course drive, the logged in users or course users or just the instructors and the admin of the website.
- Hide Instructor in whole Site (single instructors) : This disables the instructor display on the website, its suitable for a website with just one instructor, as you do not want to show his/her name on the website everywhere.
- Change Pre-Required Course Condition from submitted to Evaluated : After enabling this students will have to wait for course evaluation by the instructor to move on to courses which have pre-requisite course under evaluation. By default the students will be able to get access of the course when they mark the pre-requisite course as finish.
- Hide Members section in Single Course page : This will hide members section from single course page.
- Show curriculum below Course description : This will show curriculum below the course description.
- Disable Course Certificate image mode : If you checked the checkbox then it will disable the image mode in the certificate. Tutorial
- Free units should only be accessible to logged in members : If you checked the checkbox then the non logged in users cannot access any free units in the course curriculum.
- Remove Finished Courses from directory : If it is enable then it will automatically remove finished courses from course directory for user.
- Fix Course Menu on Scroll : The course menu will be fixed even if you scroll the page. Its suitable if you have very long course descriptions. It developed for only c2, c3 and c5 layout.
- Show Course Badge & Certificate in PopUp on course details : If you checked the checkbox then it will display the course badge and certificate in popup in the course details section.
- Open Login popup for non logged in users when they click on take this course button : If you checked the checkbox it will open a login page popup when a non-logged in user click on take this course.
- Enable Course Duration from Start Course : If you checked the checkbox the course duration will be calculated from the time the user clicks on start course button.
Course Status Settings
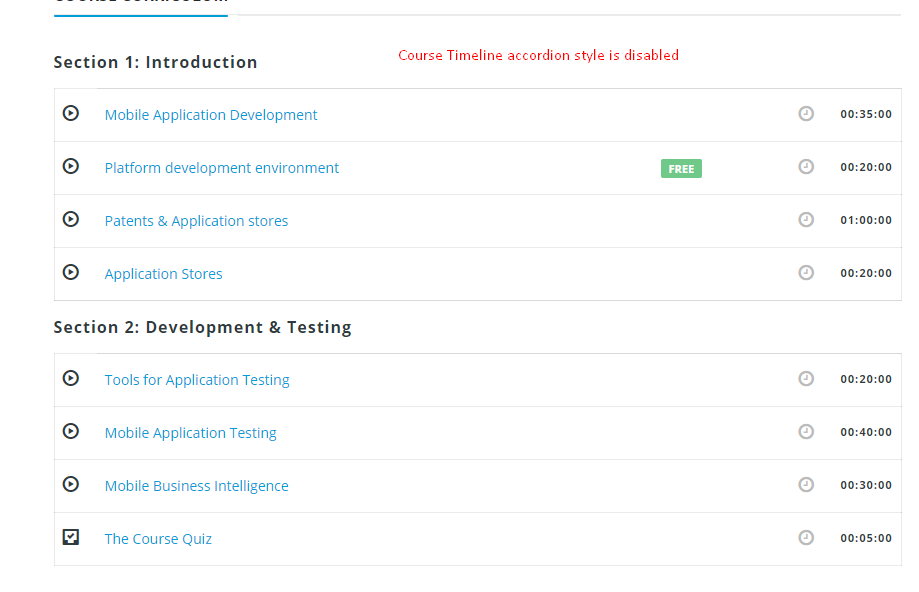
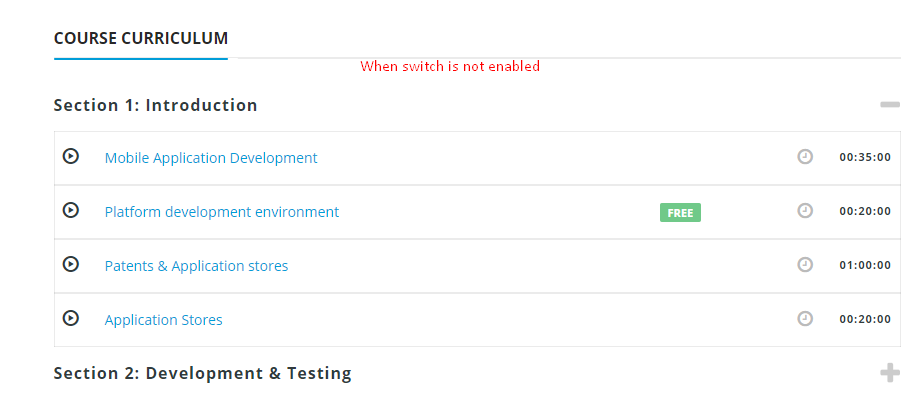
- Course Timeline Accordion style : Show curriculum accordion style. Accordion Style is the tab style in which you have to click on the Sign(+) to view the content.
- Disable ajax in Course unit load : Ajax calls are faster because it loads the part of the content which is required at that time instead of loading the whole content. In WPLMS same method is applied on unit loading. Some custom Plugins like visual composer are not ajax compatible. So, while using visual composer we need to disable this setting.
- Show unit slug and title in Course Status page : Unit slug and title is displayed in the title of the course status page when user is viewing a unit. When this setting is enabled then while accessing the unit(on the course status page) the URL will be like : yoursite/course/course-name/unit-name
- Auto-mark unit complete when user proceeds to next unit : Sometimes user forgot to click on "mark unit complete button" and not realize that their units are not completed. To overcome this, there is a setting present in LMS > Settings >Hides "Mark Unit Complete" button which auto marks the unit as completed when user proceeds to next unit.
- Auto trigger finish course button : Hides Finish course button and is automatically triggered on completion of all the units and quizzes.
- Skip Course status page : Skip the introductory page, course status description on course start or continue.
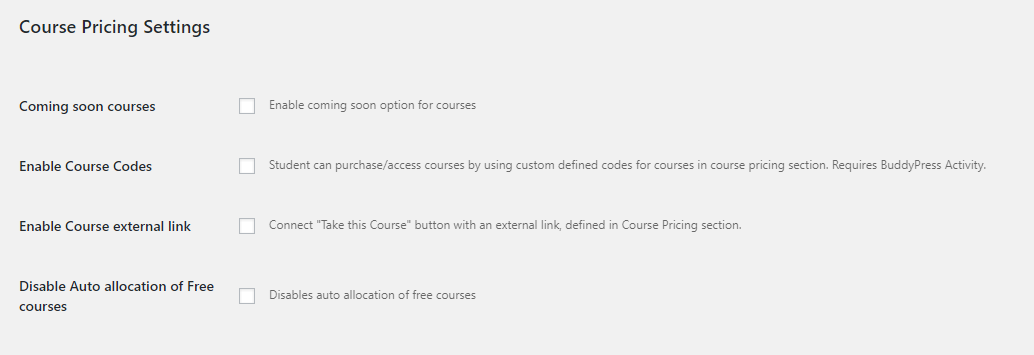
Course Pricing Settings
- Coming soon courses : If you checked the checkbox then it enables the coming soon options for courses in the course pricing section.
- Enable Course Codes : If you checked the checkbox then student can purchase/access courses by using custom defined codes for courses in course pricing section. A user with a course code can directly subscribe to the course from the Course codes widget.
- Enable Course External Link : If you checked the checkbox then you can connect "Take this Course" button with an external link, defined in Course Pricing section. When the user is on the course page then the course button is converted into the external link. When user click on take this course button then the user is taken to the external link.
- Disable Auto Allocation of Free courses : Whenever a user opens a course page and if that course is a free course then the user gets enrolled in the course automatically. If you check this checkbox then the user will not be enrolled in the free course automatically until they click on the take this course button.
Unit Settings
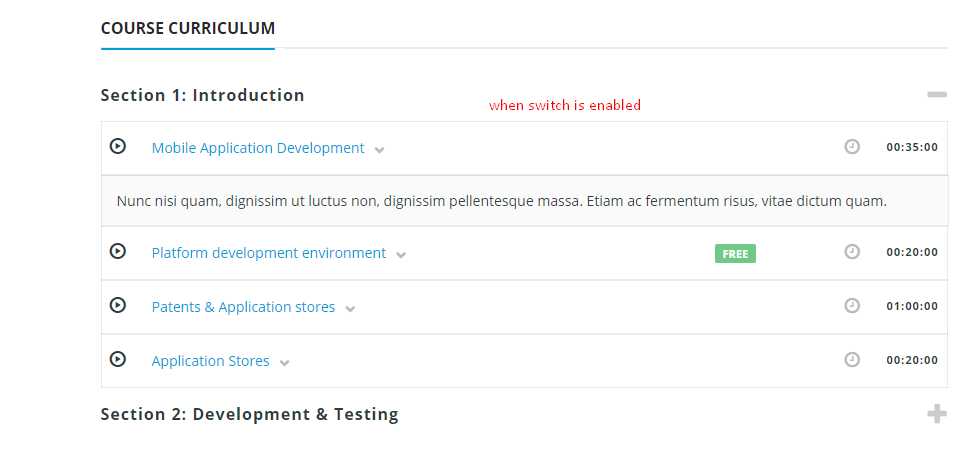
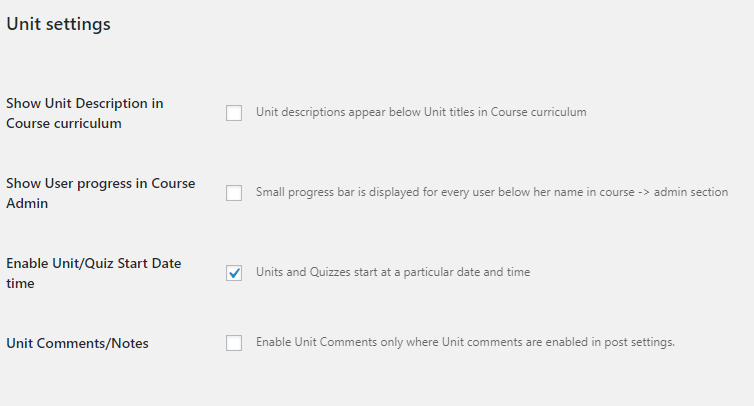
- Show Unit Description in Course curriculum : If you checked the checkbox then unit description appears below unit titles in Course curriculum.
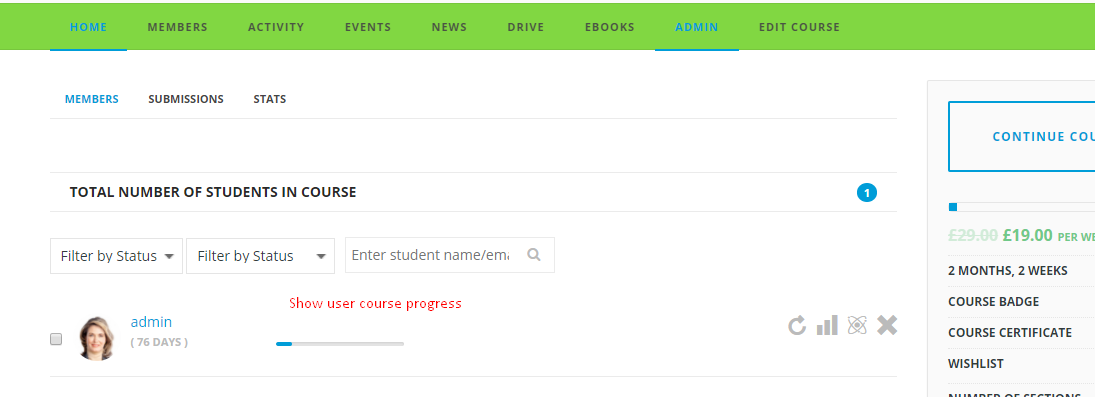
- Show User progress in Course Admin : Enabling this will show small progress bar for every user below her name in COURSE->ADMIN SECTION. Using this setting, administrator will be aware of the user's progress that how much course is completed by the user. An administrator can easily track record of user's progress.
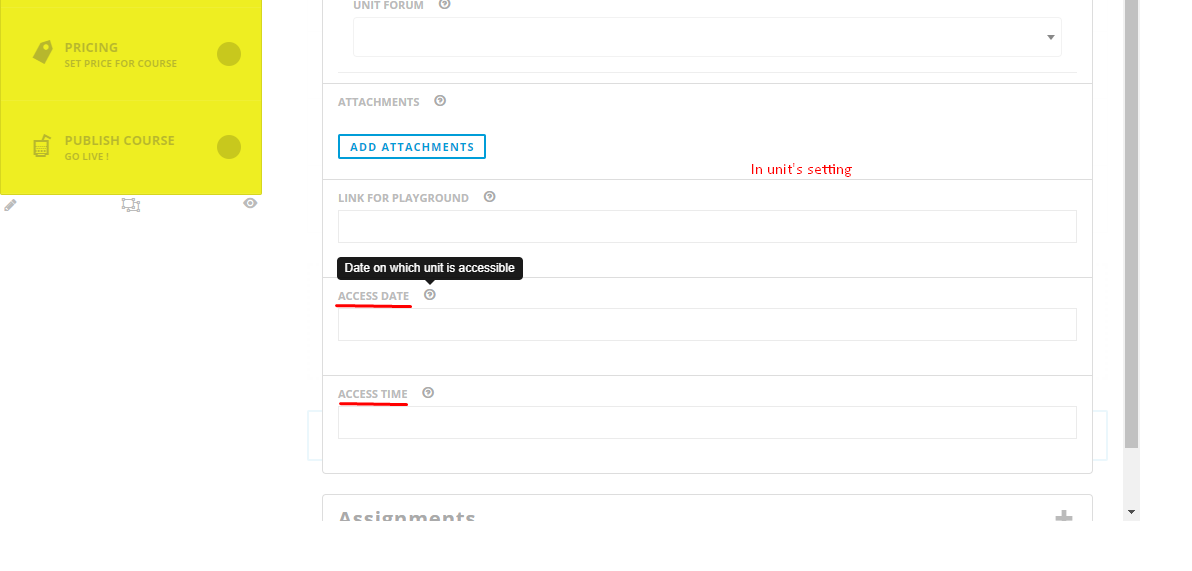
- Enable Unit/Quiz Start Date time : After enabling this it will add setting in the units and quizzes settings to set the start date and time in it and the units and quizzes will start at a particulat date and time. You can check this setting when you edit your course from front end. Edit the unit and in the unit's setting, you'll get the setting for access time and access date for unit.
- Unit comments/Notes : Enable unit comments only where comments is enabled for units. You can enable/disable notes/discussion features for particular units by editing the units in wp-admin panel and disabling comments in discussion metabox. If you disable comments for a unit, the notes and discussion module for that unit is disabled. Tutorial : Notes & Discussion Styles
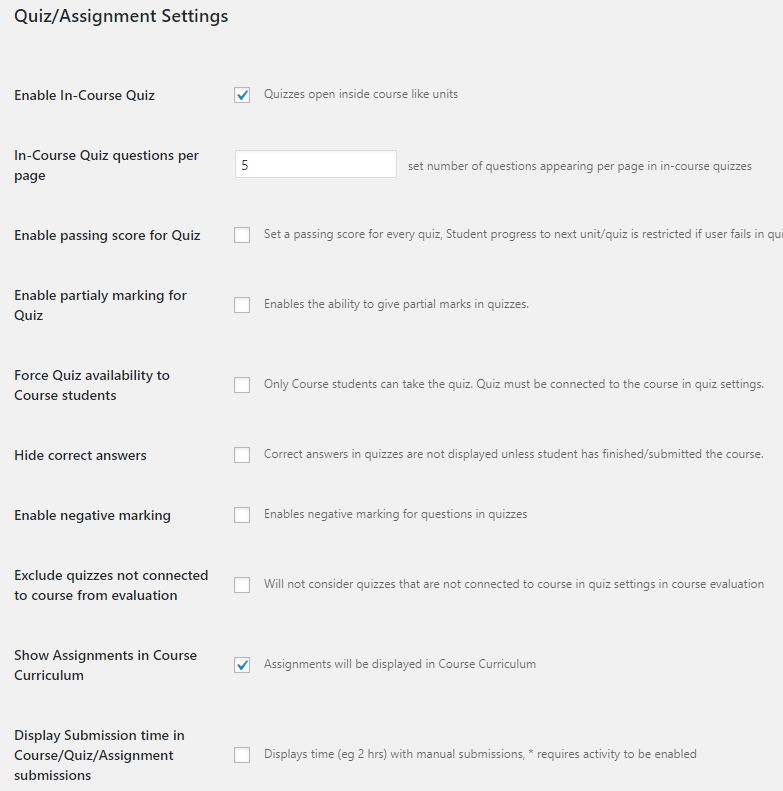
Quiz/Assignment Settings
- Enable In-Course Quiz : If you checked the checkbox then quizzes open inside course like units. Follow this video Tutorial : In-Course Quiz
- In-Course Quiz questions per page : It set number of questions appearing per page in in-course quizzes.
- Enable passing score for Quiz : It will set a passing score for every quiz, Student progress to next unit/quiz is restricted if user fails in quiz. Follow this video Tutorial : Quiz passing Score Feature
- Enable partial marking for Quiz : It will enables the ability to give partial marks in quizzes. If some of your answers is wrong and some of them are right then student will get marks for each right answers.
- Force Quiz availability to Course students : If you checked the checkbox then only course students can take the quiz. Please make sure quiz is connected to the course in quiz settings.
- Hide correct answers : If you checked the checkbox then correct answers in quizzes are not displayed unless student has finished/submitted the course.
- Enable negative marking : It will enable negative mzrking for quizzes questions
- Exclude quizzes not connected to course from evaluation : After enabling this switch it will not consider quizzes that are not connected to course in quiz settings in course evaluation
- Show Assignments in Course Curriculum :When checkbox is checked then assignments will be displayed in course curriculum. The assignment is basically connected to a unit. By enabling this feature you display assignment link in the course - curriculum section.
- Display Submission time in Course/Quiz/Assignment submissions : This setting displays time (eg 2 hrs) with manual submissions, * requires activity to be enabled.
Front End Settings
- Force Administrator Approval on every setting : If you checked the checkbox then instructor's courses will go to pending mode when settings/pricing/curriculum is saved. *Requires Administrator Approval enabled in WPLMS - Course Manager.
- Enable Front end course deletion : Through this setting instructors will be able to delete course and related content from front end.
Miscellaneous Settings
- Enter Guest User id: If a unique id is set here then This user id will be used for all guest sessions.
- Enable Unsubscribe link for students: Students will be able to unsubscribe from courses from profile -> courses -> stats.
- Revert pretty permalinks for Courses : If you checked the checkbox then it will revert permalinks from coursname/admin to coursename/?action-. Earlier we used to load tabs like this: wplms.io/demos/demo1/course/course-name?action=curriculum and now we load them like this : wplms.io/demos/demo1/course/course-name/curriculum. This is pretty permalinks: wplms.io/demos/demo1/course/course-name/curriculum
- Enable Course forum privacy : Enabling this will allow ony those students in course forum who are aleady enrolled in the course. Only course students can access course forums. Read More About Course Forum Privacy : Course Forum Privacy Feature
To make visible back to course in forum : Back To Course in Forum - Default order in course directory : A dropdown containing order:
- Recent
- Alphabetical
- Number of students
- Rating
- Upcoming Courses via Start date
- Random
By default it is set to recent
- Default order in Members directory : a dropdown containing order
- Last active
- Newest Registered
- Aplhabetical
by default it is set to menu order
- Limit Number of Courses per Instructor : You can limit number of courses per instructor by specifying the number in the box( 0 for unlimited course per instructor ).
- Limit Number of Units Created per Instructor : You can limit number of units per instructor by specifying the number in the box( 0 for unlimited course per instructor ).
- Limit Number of Quiz Created per Instructor : You can limit number of quizzes per instructor by specifying the number in the box( 0 for unlimited course per instructor ).
- Buy Points Link : You can Buy Points for MyCred, displayed when user points are less than required.
WPLMS Batch Settings(when wplms batch plugin is activated)
- Enable Batch Course Visibility switch : Enable "BATCH COURSE VISIBILITY" switch would restrict course visbility for batch students to batch courses.
- Enable Course auto subscribe for Batch students : Students in Batch are automatically subscribed to Batch courses.
- Enable Batch specific curriculums : Adds ability to load different curriculum for batches
- Enable Enroll Now Button in Batch on Course Page : Adds the Enroll Now button for all users even non logged in users on course page
- Enable Buy Batch :Enables wplms buy batch shortcode. Tutorial
WPLMS Custom Learning Path Settings(when wplms custom learning paths plugin is activated)
- Disable Enroll out button : Enabling this setting will hide the enroll out button from single learning path page.
- Exclude Steps from Learning Path : Select Steps which you want to exclude from the learningpath "select steps".
- Buy Points Link : Buy Points for MyCred, displayed when user points are less than required. Follow this Tutorial on Custom Learning Path(CLP) : CLP Introduction
PDF Certificates
- Show PDF Certificates only : Show only PDF certificates.
WPLMS Gift Course Settings(when wplms gift course plugin is activated)
- Enable non-logged in users to send gifts : Enabling this setting will allow non-logged in users to send gifts.
- Send free courses as gift : Enabling this setting will allow users to gift free courses also.
- WPLMS Wishlist Settings(when wplms wishlist plugin is activated)
- Disable add to collection icon on courses : Enable to disable direct add to collection on courses.
WPLMS Woocommerce Settings(when wplms woocommerce plugin is activated)
- Enable Various Products Popup in Course Page : Enabling this setting will show variable pricing/product in a popup on course page.
- Display Batch Price On Course Page : Enabling this setting will show batch pricing on course page.
- Enable Instructor Premium Courses : Enabling this setting enable the instructor premium courses feature in the website. The administrator can restrict the instructors from creating the courses and the instructors will have to purchase the courses to continue publishing courses.
- WPLMS Course Events Settings
- Course Events calendar display : Choose from two types of calender. Default and list type.
- Tours Settings
- Enable Tours : If you checked the checkbox, this will enable tour functionality in site. The tour functionality will guide you how to pursue a course.
- Enable all tours by default for users : If you checked the checkbox, this will enable all tours by default for users.
Registration Forms
LMS Registration Form setting build registration forms for instructors and students as well as connect form with fields. It controls following settings :
- Auto Generate Username From Email
- Show Password Meter
- Show Field Group Labels
- Google Captcha
- Register & Login Simultaneously
- Skip Mail Verification
- Assign User Role: From this setting you can assign user role.
- Add To BuddyPress Group
- Assign member Type
Here, you can select form fields which will be visible in your custom registration form and save those fields.
Follow the tutorial : Custom Registration Form in wplmsCourse Settings
LMS Course Settings controls all the setting which is displayed in the sidebar of single course page. You can delete to hide these settings and rearrange it too.
Logged in Menu
This LMS setting is used to customize your profile menu. You can also rearrange the order of the profile menu fields. To add new fields to show it in your profile menu, click on add new item and by dropdown menu select those fields you wish to view. Refer the Tutorial : Customized Logged In MenuCourse Menu
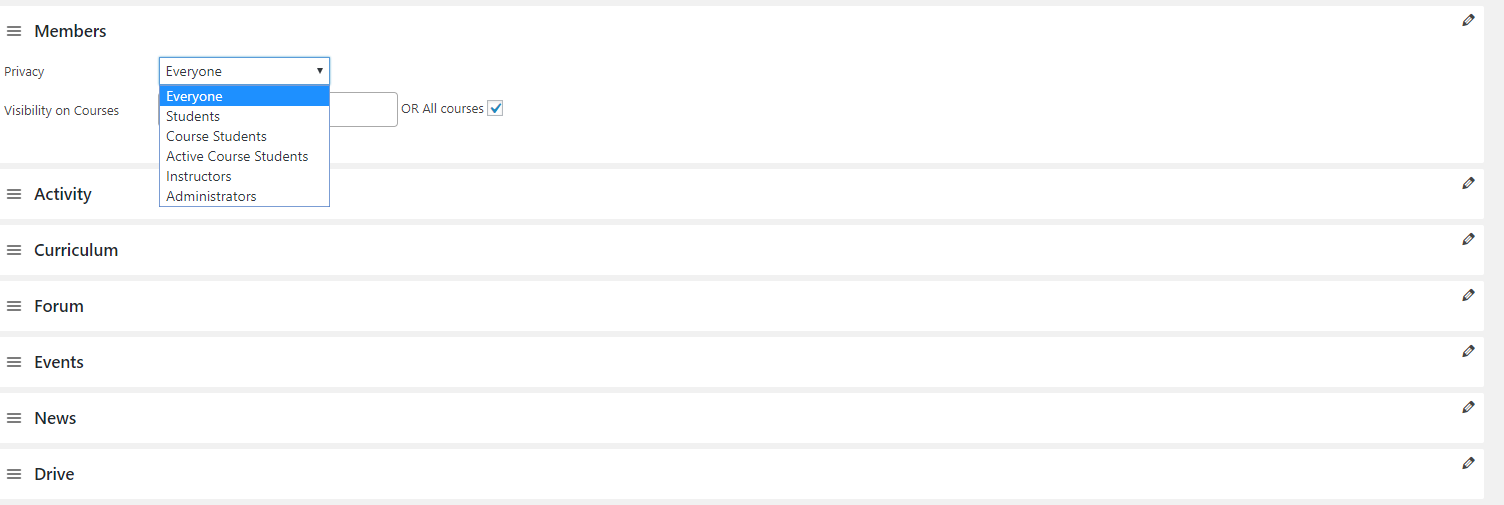
This LMS Setting is used to customize course menu which is visible on single course page. An Administrator have the access to set the privacy of these courses for everyone, for instructors or only for students. He can set visibility of these menus on selected courses or for all courses.Member Types
After adding member types you can set the Member types widget in your sidebar to show filtering according to member type on members directory. Member type can be assign with custom registration forms also. In wplms custom registration settings you will see a new settings for member type.Group Types
To Group Types from , wp-admin > LMS > Settings > Group Types. Like Member Types You can set Group Types also. Refer the tutorial : Set Member Types & Group Types
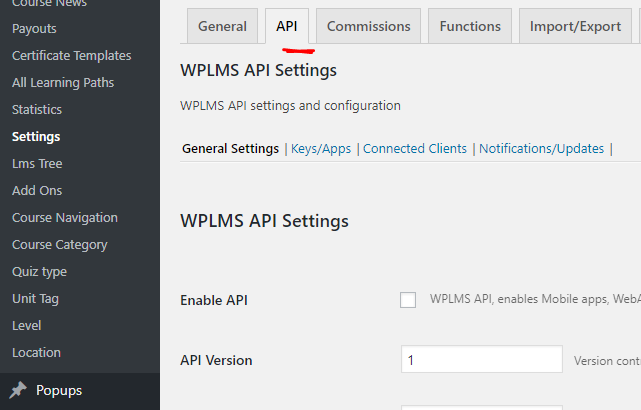
LMS : API Settings
WPLMS 3.0 uses OAuth 2.0 Server for authentication and user management. Though we’re not using all the features of the oAuth server, it is a very secure tool for managing site user login and registrations.
Following points will highlight the benefits of this feature :
- Facilitate Secure Mobile App Authentication : Since mobile app access login data remotely without actually logging in to your WPLMS site, this feature was required for user authentication and management.
- Authentication via Tokens : Once a user is verified , the oAuth server generates a secure Authorization token which is accompanied and verified in every API call which is trying to access and modify confidential data. Then tokens expire and can be removed from WPLMS API panel, so it presents a secure way of communication between apps and your web site.
- Site Identity : Every site can be easily distinguished with another via state factor which is uniquely added to every site.
- Built for WPLMS Mobile apps : Since the API and APP development happened side by side for WPLMS, we have added special features to enable better communication and management of users connected via apps with your WPLMS site.
Refer the tutorial : WPLMS Rest API
LMS : Commission Settings
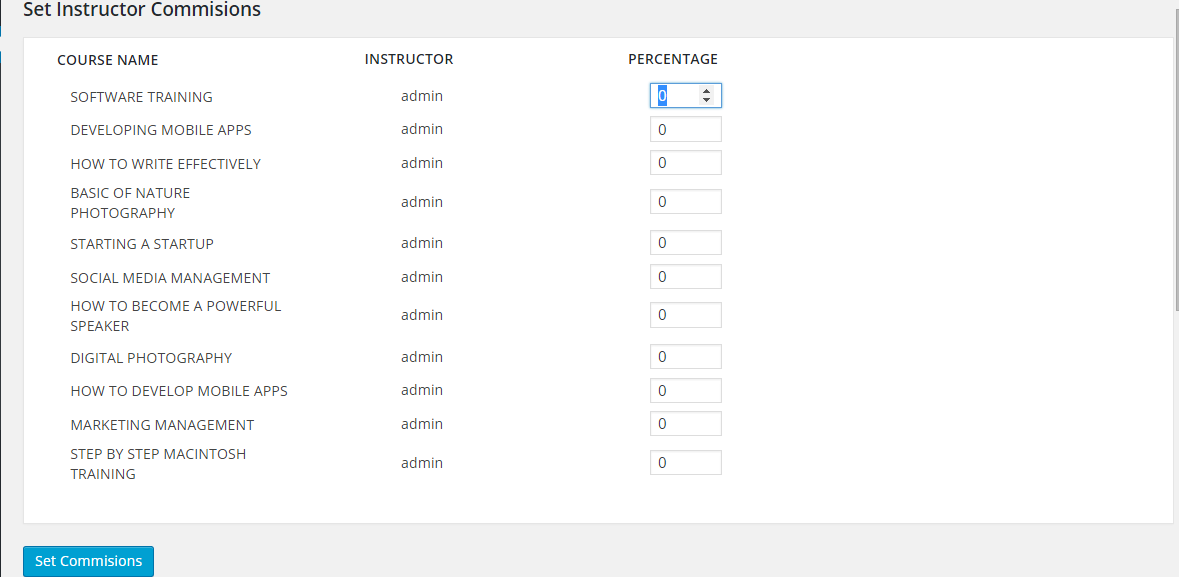
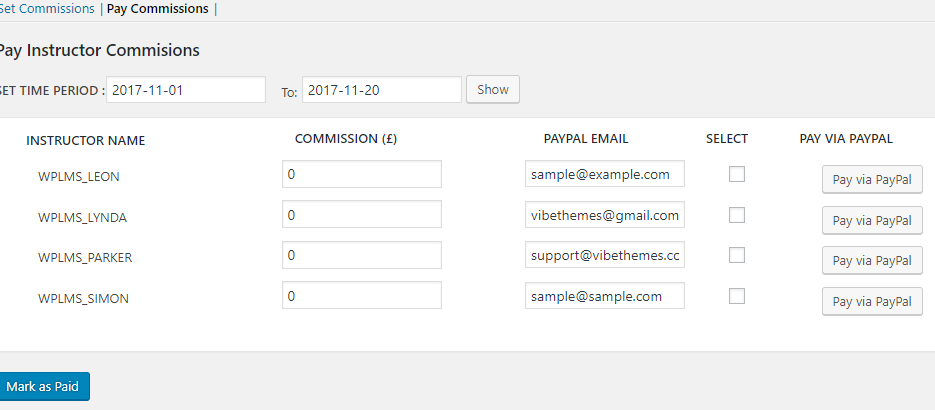
LMS Commissions is categorized into two parts : Set Commissions & Pay Commissions.
- Set Commissions : You can set commissions of instructors based on course and the instructor for the same course .Different instructors may assign different commissions. The commission is assigned in percentage value.
- Pay Commissions : You can pay commission to the instructor based on the time period i.e you can specify the start time period and end time period and when you click on show button then it shows: Instructor, Commission of an Instructor, Email Id of an Instructor, Checkbox, A Button (Pay via PayPal). There is a button "Mark as Paid" which allows to marking the instructors that are paid.
LMS Admin Functions [ For Ad-Hoc Management]
LMS Admin functions are categorized into two parts : Sync Areas and Ad Hoc.
It is mainly added for developers. It is used to push meta field value in any post_type or user. It also shows current time stamp that is useful for other functions added in wplms.
Import/Export WPLMS Elements
Download and upload in CSV format. Import/Export WPLMS elements with user statuses: Courses, Quizzes, Units, Assignments, Questions and Events.
Export Settings
- Select Module : A dropdown which contains module types such as course, unit, quiz, question and assignment. Select a wplms module that you want to export
- Set Taxonomy : By default all are selected but you can specify a particular if you want.it is an optional field.enter comma separated modules for more than one modules.
- Set Taxonomy Term : By default all are selected but you can specify a particular if you want.it is an optional field.enter comma separated modules for more than one modules.
- Specific Module/s Ids : By default all are selected but you can specify a particular if you want.it is an optional field.enter comma separated modules for more than one modules.
- Export content : If you checked the checkbox then you can export the content of the module.
- Export Settings : If you checked the checkbox then you can export module settings.
- Export Taxonomies : If you checked the checkbox then you can export optional taxonomies and relationship.
- Export Comments : If you checked the checkbox then you can exports reviews for courses, answers for questions and assignments.
- Export connected modules : If you checked the checkbox then you can export connected modules, like units,quizzes,assignments with courses, questions with quizzes etc.
- Export Users : If you checked the checkbox then you can export users profile.
- Export Connected User data : If you checked the checkbox then you can export user statuses for module/sub-modules.
- Start Point : the number specifies starting key count for module, recommended for larger exports.
- Number of Modules : the number specifies maximum no. of modules to export.
click on Generate Export file-> Download Export File
Import Setting : To Import a file :Select File to upload [ Maximum upload size 64 MB(s). click on choose file(it should be .csv file)->upload file.
Refer the tutorial : Import/Export Wplms via CSV
Touch Points
Set the touch points for student and instructor in wplms and connect with them via these touch points. Touch points are set for getting the notification,message and email on the following touch points when they triggered.
- Announcements : When the announcement is made the student and instructor get notified by email, notification and message.
- News :Student and instructor get notified by email, notification and message when any news is done.
- Course Subscribed:Student and instructor get the notification , email and message when the course is suscribed to the student.
- User added to Course:Student and instructor get the notification , email and message when the student is added in the course.
- User starts a Course:Student and instructor get the notification , email and message when the student starts the course.
- Course Certificate:Student and instructor get the notification , email and message when the student is assigned/removed with the course certificate.
- Course Badge:Student and instructor get the notification , email and message when the student is assigned/removed with the course badge.
- Course Reset by Instructor:Student and instructor get the notification , email and message when course is reset by the instructor.
- Course Retake by User:Student and instructor get the notification , email and message when the student retakes the course.
- Course Submit:Student and instructor get the notification , email and message when the student submit the course.
- Course Evaluation:Student and instructor get the notification , email and message when the student submit the course for evaluation.
- Course Reviews:Student and instructor get the notification , email and message when the student or instructor writes the review in the course.
- Unsubscribe Course:Student and instructor get the notification , email and message when the student is unsubscribe from the course.
- Unit marked complete by User:Student and instructor get the notification , email and message when the student marks the unit complete and move to the next unit.
- Unit marked incomplete by Instructor for Student:Student and instructor get the notification , email and message when an instructor marks the unit incomplete for the student.
- Unit marked complete by Instructor for Student:Student and instructor get the notification , email and message when an instructor marks the unit complete for the student.
- Unit comment added by User:Student and instructor get the notification , email and message when the student add note or discussion comment in units.
- Quiz Start by user:Student and instructor get the notification , email and message when the student starts the quiz.
- Quiz Submitted by user:Student and instructor get the notification , email and message when the student submit the quiz.
- Quiz Reset by Instructor:Student and instructor get the notification , email and message when the quiz is reset by the instructor.
- Quiz Retake by User:Student and instructor get the notification , email and message when the student retake the quiz.
- Quiz Evaluation:Student and instructor get the notification , email and message when the student submit the quixz for evaluation.
- Assignment Start by user:Student and instructor get the notification , email and message when the student starts the assignment.
- Assignment Submitted by user:Student and instructor get the notification , email and message when the student submit the assignment.
- Assignment Evaluation:Student and instructor get the notification , email and message when the student submit the assignment for evaluation.
- Assignment Reset By Instructor: Student and instructor get the notification , email and message when tan instructor reset the assignment for student.
- Student Appplied For Course:Student and instructor get the notification , email and message when the student apply for a course.
- Instructor approves/rejects user application:Student and instructor get the notification , email and message when an instructor approves/rejects user application.
- Instructor Publishes a Course or Sends for Approval:Student and instructor get the notification , email and message when an instructor publishes a course or sends for approval.
- Student Enrolled in LearningPath:Student and instructor get the notification , email and message when the student enrolled in LearningPath.
- Student Enrolled out from LearningPath:Student and instructor get the notification , email and message when the student enrolled out from LearningPath.
- Student Completed a step in LearningPath:Student and instructor get the notification , email and message when the student completed a step in LearningPath.
- Student got Badge in LearningPath:Student and instructor get the notification , email and message when the student got a badge in LearningPath.
- Student got Certificate in LearningPath:Student and instructor get the notification , email and message when the student got a certificate in LearningPath.
[Note] : Learning Path Touch Points will be visible only when wplms Learning Path Plugin is activated.
Emails
All the email templates are now migrated to buddypress email template. Here you can set the from and email address from which the email will be sent. Also you can edit the email template from the buddypress emails when you click on edit email template.
-
Email Options
- Set "From" name, this is the name from which the email will be sent.
- Set "From" email, from which the email is to be sent.
- You can edit the contact Form Email.
- You can edit the activation Email.
- You can edit the forgot password Email.
-
Email Schedule
- Set the Drip feed email when the unit or section will be available. Enable/disable the drip feed email,schedule the email time i.e schedule the time when the unit or section will be available for example:before 12 hours of availablity,set the subject and message that is to be sent in email.
- Set the course expiry email. Enable/disable the course expiry email,schedule the email time i.e schedule the email time when the course will be expired for example:before 12 hours of expiry,set the subject and message that is to be sent in email.
- Set the inactivity email. Enable/disable the user inactivity email,schedule the email time i.e schedule the email time when the user is inactive on the website, for example:you set the inactivity email time to 30, this means the users who are inactive for more than 30 days will be sent the email. Refer the tutorial : Schedule Email for Inactive Users
- Schedule Course Review Email. Enable/disable the schedule course review email i.e. email students when the course is finished and the user has not given any review to the course.
-
Scheduled Emails
- You can check which emails are scheduled in your website to be sent.
Refer the full video tutorial : Touch Points
Course Creation Module
In this module, you'll learn about full course creation module including adding unit, unit creation, questions creation, creating assignments, creating events, etc.
-
Creating Questions
-
Adding a New Question
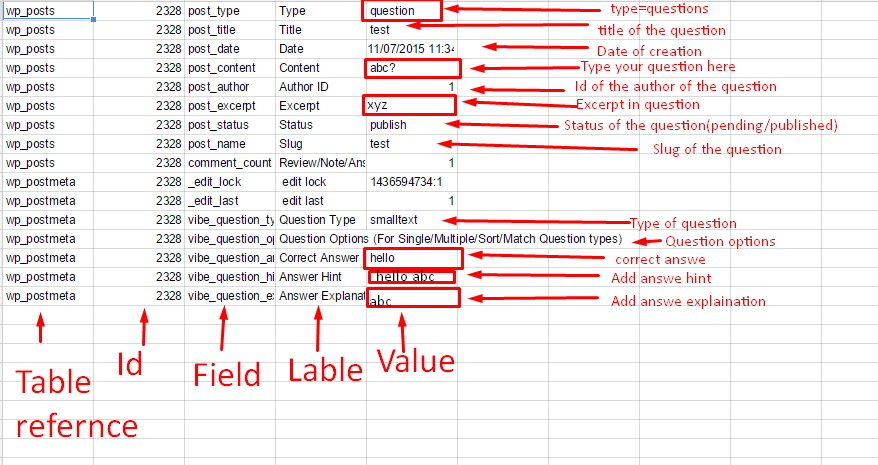
- Login to Admin Panel. Go to LMS section and click on All Questions.
- Now click on Add New button.
- Now fill in the reference name of the question like “Maths Quiz1 Question1″ etc, naming your question helps in putting up questions together while making a quiz. After naming, enter the question in the editor area.
-
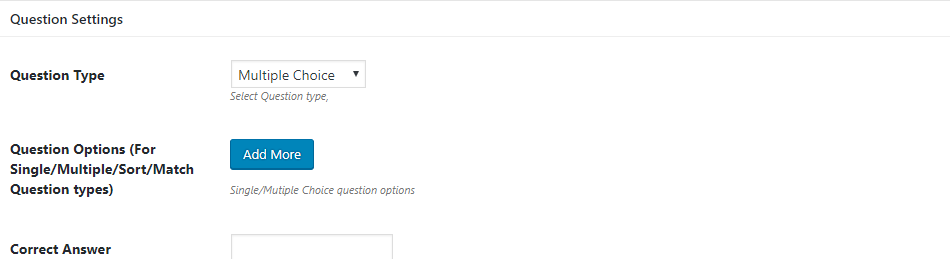
Question Settings
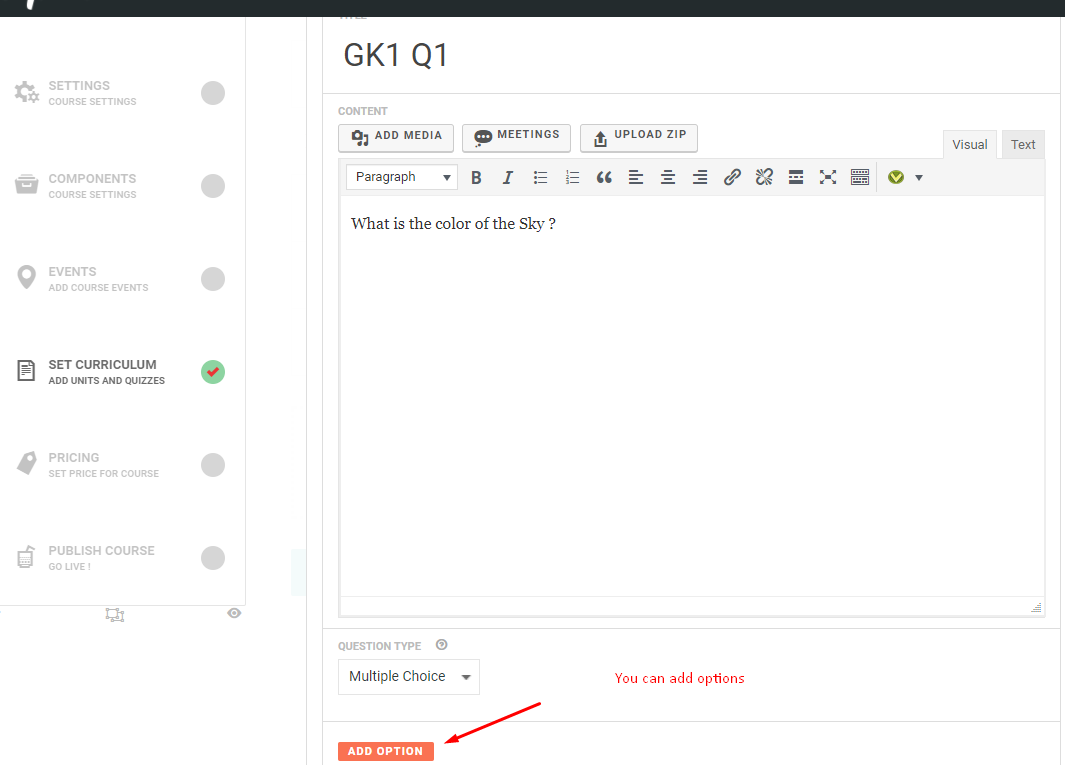
- Question Type: Select question type here. You can select from Multiple Choice (Select one from options), Multiple Correct(There can be multiple answers), Select Drop down, Fill in the blank, Match answers, Sort answers, Small Text(One Word or Sentence), Large Text(Essay Type Questions).
- Question Options : Enter option by clicking on Add More. You can arrange the order of the options by dragging the small arrow button(in blue) on left hand side of the option number.
- Correct Answer: For Single/ Multiple choice, enter the correct answer choice number and separated by comma in case of multiple answers. In case of Small Text, enter the full complete answer in the space given. This would help the instructor to evaluate quiz after it is completed and submitted by the student.
- Answer Hint :Add a hint or clue to show to students.
- Answer Explanation :Add an explanation for your answer.
- Title Background Image :Add a background Image for your title which gives you better look and feel.
- Finishing Question : Add a question tag for your question and publish.
-
Adding a New Question
-
Creating Quizzes
-
Adding a New Quiz
- Login to Admin Panel. Go to LMS section and click on All Quizes.
- Now click on Add New button.
- Now fill in the details like Quiz Name in the heading of the post, and the instructions or any other information like type and questions you want to tell users before they head for the quiz in the editor area. The editor area is same as that for posts, pages and supports WordPress native audio and videos.
-
Quiz Settings
- Quiz Subtitle: Enter a subtitle of the quiz here. The description comes below the Quiz name.
- Connected Course : The courses connected with that particular quiz.
- Quiz Duration: Select the total duration of the quiz in minutes. The time will set accordingly in the timer.
- Quiz Duration Parameter :Selects the parameter for duration(minutes, seconds etc).
- Auto Evaluate Results :As soon as quiz is completed, results are evaluated.
- Post Quiz Message :The message box appears after the quiz has been completed by the students.
- Add Check Answer Switch :Instantly check answer answer when question is marked.
- Dynamic Quiz :Dynamic quiz automatically selects questions.Tutorial
- Dynamic Quiz Question Tags :Select Question tags from where questions will be selected for the quiz.(required if dynamic enabled)
- Randomize Quiz Questions :Random Question sequence for every quiz.
- Quiz Questions :Add the quiz questions here. The question here appears from the All questions that has been created by the instructor. Since the question database is common so the column shows all the questions created by all the instructors. So, it is very important to give a meaningful and identifiable question name while creating a question.
- Title Background Image :Add a background Image for your title which gives you better look and feel.
-
Adding a New Quiz
-
Create Units
-
Adding a New Unit
- Login to Admin Panel. Go to LMS section and click on All units.
- Now click on Add New button.
- Now fill in the details like Unit Name in the heading of the post, and the instructions or any other information like type and questions you want to tell users before they head for the quiz in the editor area. The editor area is same as that for posts, pages and supports WordPress native audio and videos.
-
Unit Settings
- Unit Description: Enter a small list/description of the unit here. The description comes below the heading of the Unit.
- Unit Type: Select unit type from General(Simple Text Unit) , Audio, Video or Podcast. Selecting the unit type comes handy in course curriculum where the unit icons are shown based on this selection i.e. in case of a video unit, a video icon will be shown along with the unit name in the course curriculum.
- Free Unit: Select Free Unit Show or Hide. Show option makes the Unit as free and allow users to see the unit for non logged in users before purchasing the course.
- Unit Duration: Enter the estimate of the duration of the course in Minutes.
- Unit Duration Parameter: Selects the parameter for duration(minutes, seconds etc).
- Unit Forum: BbPress Forum can be connected to an individual unit from here. Select the Unit forum or Course Forum or any other forum instructor wish to connect with this Unit. Forums are useful for instructor and students interaction, clearing the doubts and creating a social connection within the group opting the course.
- Connect Assignments: Add assignments in a particular unit for students.
- Attachments: Add attachments, so students can view and download thise attachments from the unit.
- Link for Playground: Put Link on Playground Button
- Access Date: Date on which unit is accessible.
- Access Time: Time after which unit is accessible.
- Title Background Image: Add background image for title.
-
Adding a New Unit
-
Create Assignments
-
Description Assignments are an integral part of course which represent homework or offline work job which require a longer duration of time in days and are manually evaluated by instructors.
- Assignments are like questions with timer and upload functionality.
- The assignment timer runs for days
- The assignments are manually evaluated by instructor.
- The assignments can be connected to a Unit or an Event.
- Assignment can also be included in courses for course evaluation, that is when the course is evaluated the cumulative percentage of all the quizzes and assignments will be calculated for auto-eveluate courses. For manual evaluation, assignment marks will be shown along with quiz marks for grading purpose.
- Creation
- Login to Admin Panel
- Go to LMS section and click on All Assignments
- Now click on Add New
- Now fill in the details like Assignment Name in the heading of the post, and the question of the assignment. The question can include multimedia like images, audio and videos.
-
Assignment Settings
- Assignment Sub-title: Enter a sub-title for the assignment. Sub title is an important description text shown below the Assignment title.
- Sidebar: Select a sidebar which appears below the timer.
- Assignment Max-Marks: Marks for assignment, required if you're adding the assignment in a course for evaluation.
- Assignment Maximum Time limit ( Days ): Set the maximum time for the assignment timer. The assignment is automatically submitted when the timer expires.
- Assignment Duration parameter:
- Include in Course Evaluation: If set to yes, assignment marks will be included in course for calculating cumulative percentage based on which badges and certificates are awarded to students.
- Include in Course: Include this assignment in a course.
- Assignment Submissions: Select a Assignment submissions type. Upload file or text only.
- Attachment Type: If Assignment submission is "upload file" then select permissible attachment types. This is an important setting as it detects the type of file uploaded and secures the upload functionality. This functionality however requires few functions to be installed in the server, if you've seen the notification on assignments and you want to use the upload functionality you need to contact your webhost to enable these functions.
- Attachment Size (in MB): limit the maximum attachment size but size should be less than 20mb.
-
Description Assignments are an integral part of course which represent homework or offline work job which require a longer duration of time in days and are manually evaluated by instructors.
-
Create Events
-
Creating a New Event
- First, you'll need EventOn Plugin.
- To create Events, Login to Admin Panel > Events > Add Event
- Now fill in the details like Event Name in the heading of the post.
-
Event Settings
- Event Subtitle : Add your event subtitle. Sub title is an important description text shown below the Event Title
- Time & Date :Select the event start date and event end date. You can also set it as a all day event or a repeating event.
- Location & Venue :Add Location and venue of events. An instructor can set location information will be visible only to logged in users, generate google maps from location address, show location information over location image.
- Organizer :An instructor can create a new organizer or add an existing one.
- WPLMS Courses :select from published course on which events should be visible.
- WPLMS Course Batch :choose a course batch
-
Finishing Events
- Select event color.
- Select an event image and publish your events.
-
Creating a New Event
-
Create Courses
A course is said to be complete, after units, quizzes are added to it.Follow the steps to create a course.
-
Adding a New Course
- Login to Admin Panel
- Go to LMS section and click on All Courses
- Now click on Add New
- Now fill in the details like Course Name in the heading of the post, and the description for the course. The course can include multimedia like images, audio and videos.
-
Course Settings
- Sidebar: Select the sidebar you want to place in the course page. Sidebars are created in the section Appearance->Widgets by the administrator.
- Total Duration of Course: Total duration of the course is the total time for which the student can access the course by logging into the site. After the duration has expired, the user will not be able to view the course content.
- Course Duration Parameter: Set the duration parameter for course.
- Total Number of Students in Course: Initially while creating the course the number of students is set to 0.
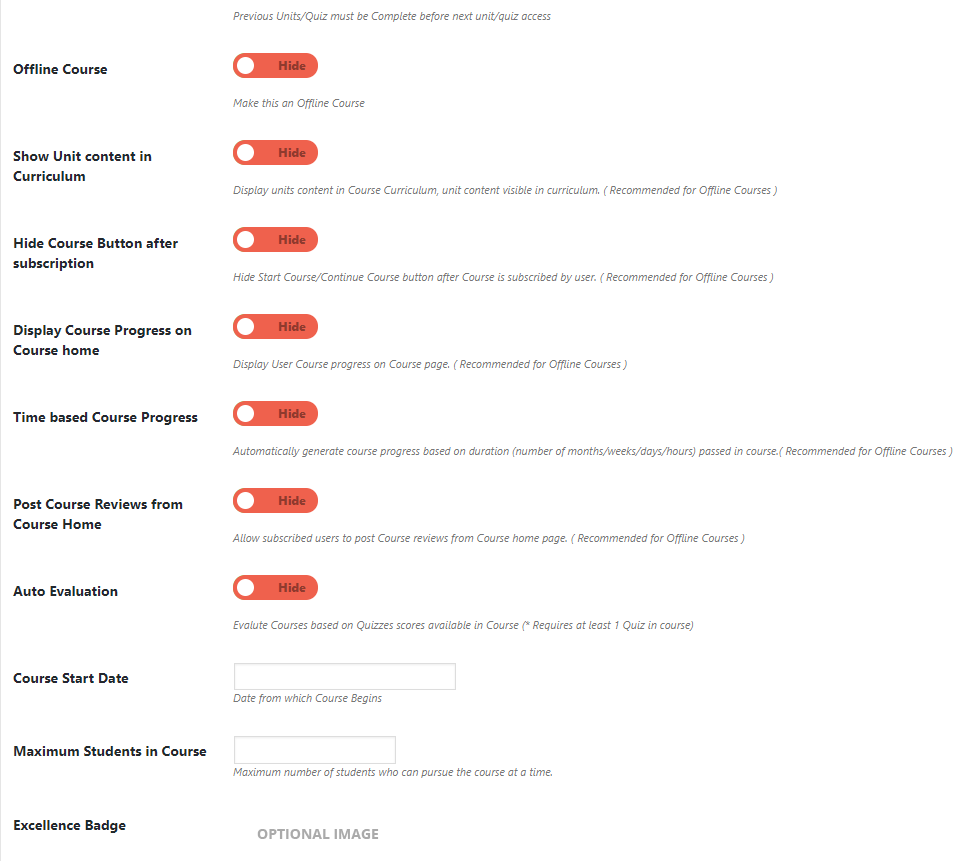
- Unit Completion Lock: Previous Units/Quiz must be Complete before next unit/quiz access
- Offline Course: Make this an Offline Course
- Show Unit Content in curriculum: Display units content in Course Curriculum, unit content visible in curriculum. ( Recommended for Offline Courses )
- Hide Course Button After Subscription: Hide Start Course/Continue Course button after Course is subscribed by user. ( Recommended for Offline Courses)
- Display Course Progress on Course home : Display a progress bar on your coures home page.
- Time based Course Progress : Automatically generate course progress based on duration (number of months/weeks/days/hours) passed in course
- Post Course Reviews from Course Home : Allow subscribed users to post Course reviews from Course home page.
- Auto Evaluation : Evalute Courses based on Quizzes scores available in Course.
- Course Start Date : Date from which Course Begin
- Maximum Students in Course : Maximum number of students who can pursue the course at a time.
- Excellence Badge: The badges are given on completion of the course and after achieving a certain percentage in the quiz i.e. the Badge Percentage which can be adjusted in the next setting. It is not necessary that every course taker will get the badge.
- Badge Percentage: This is the minimum percentage required by the students to have a badge for the course.
- Badge Title: You can set the title for the badge given after completion of the course like for a Maths course, you can set the title as Maths Champion which a student will get only after receiving the Badge Percentage .
- Completion Certificate: If set Show, after the course is completed each student who passes the course will get this certificate of completion which is printable as well as downloadable. You can design the certificate according to your requirements.Follow the tutorial in the relevant section.Even after the course has expired the student can log in and view/print/download her certificate of completion.
- Certificate Template: Select certificate template of your own choice.
- Passing Percentage: The minimum percentage required to pass the course.
- Drip Feed: Enable Drip Feed Course. Drip Feed is available in WPLMS wherein a course instructor can set duration between two successive course elements such as sections and units. Refer the tutorial :Drip Feed Content Types in WPLMS
- Course Starting Time as Drip Feed Origin: Drip feed time calculation from Course starting date/time vs previous unit access date/time (default)
- Section Drip Feed: Enable Section Drip feed
- Drip Duration as Unit Duration: Assume Drip duration same as Unit Duration. Duration between consecutive units
- Drip Feed Duration (Static): Static duration, if Drip duration not equals Unit duration. This is the duration between consecutive Drip feed units (in Days)
- Drip Duration parameter: The minimum percentage required to pass the course.
- Course Curriculum : This setting help the instructor to create the curriculum of the course by arranging the units, quiz and categorizing it in sections. Add Section enables the instructor to add a section and name it. Add Unit enables the instructor to add units which has been created earlier. The units can further be arranged under different by dragging and dropping. Add Quiz allows the instructor to add quiz after unit , section or anywhere the instructor wish to place the quiz. All the three i.e Section, Unit, Quiz are draggable and can be arranged likewise.
- Prerequisite Course : This is the pre requisite of doing the course i.e. if some course is selected , then that course must be finished before taking this new course.
- Course Retakes :Set the number of times student can retake the course.
- Course Forums :Connect your own created course forums with the courses
- Course Group :Connect your courses with the group.
- Course Specific Instructions :Some specific instructions you want to instruct to your students before starting the course.
- Course Completion Message :Display message after course completion.
- Force Batch Enrollment :If it is enabled the Student must be enrolled in a batch to pursue this course.
- Batch Display :Set style to display your batches for students.
- Hide Expired Batches :Hide expired batches from course page.
- Title Background Image :You can set a background image for your title.
-
Course Membership(included below course settings)
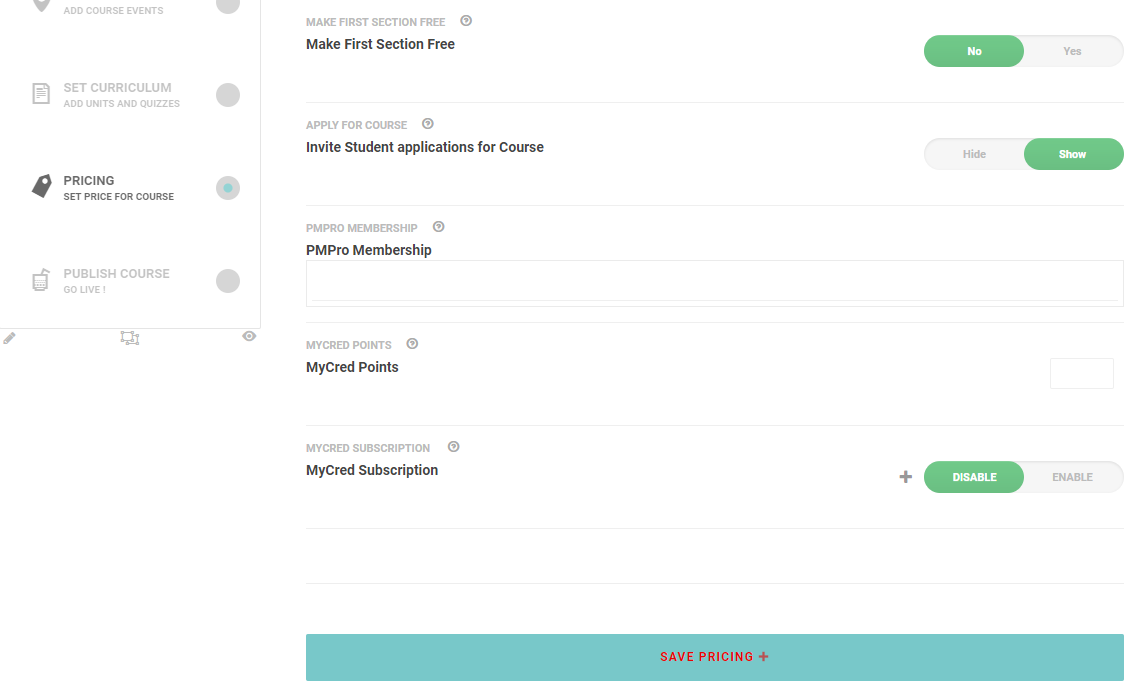
- Free Course : Instructor can set his course free for all members.
- Make First Section Free : Allows users to start the course for free, but can only see first section for free
- Apply For Course : Students are required to Apply for course and instructor would manually approve them to course. Do not enable "Free" course with this setting.
- PMPro Membership : Required Membership level for this course. What is PMPro Membership :Link(Refer Memberships Feature)
- Associated Product :Associate a product with your course.
- MyCred Points :If an user enable this setting then user need MyCred Points to take this course.
- MyCred Subscription :Enable Subscription mode for this course.
- Subscription Duration :Set Time Duration for subscription products.
- Points Duration Parameter :Subscription Duration Parameter.
-
Finishing Course
- Add featured image to the course in the right hand side of this page. This image is the main image of your course which appears in the course directory, home page etc.
- Add categories to the course. Then Publish your course.
-
Adding a New Course
-
Creating Testimonials: A Testimonial consists of a person's written or spoken statement extolling the virtue of a product.
- How to create testimonials?
- Go to wp-admin > Testimonials > Add New
- Set the title of Testimonial, content, Featured Image, Author Name, and Designation. Using Page Builder settings you can also set these testimonials to show in a carousel on your home page.
- you can even show these testimonials in a sidebar using widgets
-
Creating Groups: Groups in BuddyPress are gatherings of members, posts, and any other user-generated content. If enabled by the site administrator, any member can create a group in BuddyPress. When a member creates a group, this person automatically becomes the group administrator. Group administrators can also approve requests to join the private group, invite friends to congregate within a hidden group, establish communications among members, extend privileges to other members, and enable new features (such as Group Forums if enabled by Super Admin) among others.
- Create Groups
- Go to wp-admin > Groups > Add New
- The creator of the group can create Public group, Private Group or even Hidden group
- Before Creating a Group, first enable the User group From wp-admin > settings > Components > User Groups
- Read More about Groups -> BuddyPress Groups
-
Creating Forums: This Forum feature in wplms allow the instructors to create forums. An administrator/instructor can connect these forums with their courses. A forum has some forum attributes which are:
- Type: choose the type as forum or category
- Status: open, closed
- Visibility: Public, Private, Hidden
Tutorial: Course Forum Privacy Feature
Front End Course Creation/Editing
Front End course creation and editing allows instructors to edit course contents from the front end. Almost everything which can be done from the backend can be done form the front end. The front end course creation automatically creates and connects the necessary linkages between a course, a unit, a quiz, a product, groups and forums, thereby making course creation process a lot simpler and easier to maintain.
Create Course
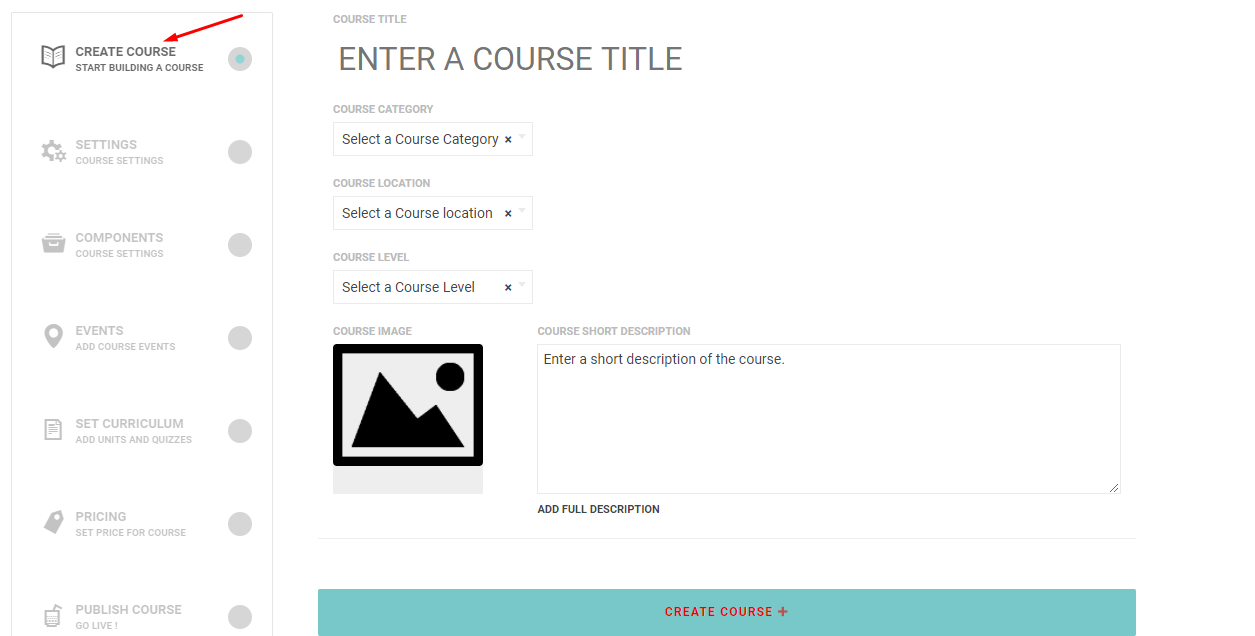
In this step a new course is created. This new course is in draft state.- Course Title Delete the existing test and enter a suitable title for the course.
- Course Category Select a Course Category, in case you want to add a new category, select new category and enter the new course category name.
- Course Image Select a Course thumbnail image. This image is used in course snapshot and single course page.
- Course Description Enter a short description of the course. This is a two line description shown below the course title. This description is also used in creating new groups and forums. The main description and content of the Course can be added later on by simply editing the course form the front end.
- Change Course Status Enter the status of the course offline or online .
Note:A Offline Course is not visible to students in the course directory.
-
Create Settings
These are vital settings for the course, which needs to be configured.- Maximum Course Duration Maxmimum duration of course in days. Entering a value of 9999 or above shows "unlimited access" as time duration for course.
- Course Evaluation mode Set evaluation mode for course.
- Pre Required course Set a pre required course for the course. The course selected here, needs to submitted and evaluated in order to get started with this course.
- Drip Feed
Enable Drip feed for course.
- Drip Duration Set Drip duration for the course. The drip duration is time period between successive units.
- Course Certificate
Enable Course certifiacte
- Certificate Percentage Set percentage out of 100. If students cumulative percentage of all quizzes and assignments is more than the value set here, she will get the certificate.
- Certificate Template Set a certificate template
- Course Badge
- Badge Percentage Set percentage out of 100. If students cumulative percentage of all quizzes and assignments is more than the value set here, she will get the badge.
- Badge Title Add a title for the Badge. This title appears when user hovers over the badge.
- Badge Image Upload a Badge image. This is required to enable Badge for the course.
Enable Badges for course
- Number of Seats Enter Number of seats for the course. The Seats comprise of students currently taking the course. Once the seats are filled, a new student would not be able to join the Course.
- Start Date Set a Start date of the course. If set to a future date, the Course begins when the Start date arrives, that is student will be able to join the course only after the start date.
- Course Group Connect a group, if creating a new course it is recommended that you create a new group for the course. By default the group created is a private group only accessible to students taking the course.
- Course Retakes Enter number of retakes a student can make of that particular course
- Course Forum Connect a forum, if creating a new course it is recommended that you connect the group forum for the course.This will create a private group forum for the above group only accessible to students taking the course and in the group.
- Course Completion message Enter a Completion message, which is shown to user when the user finishes the course or submits the course for evaluation.
-
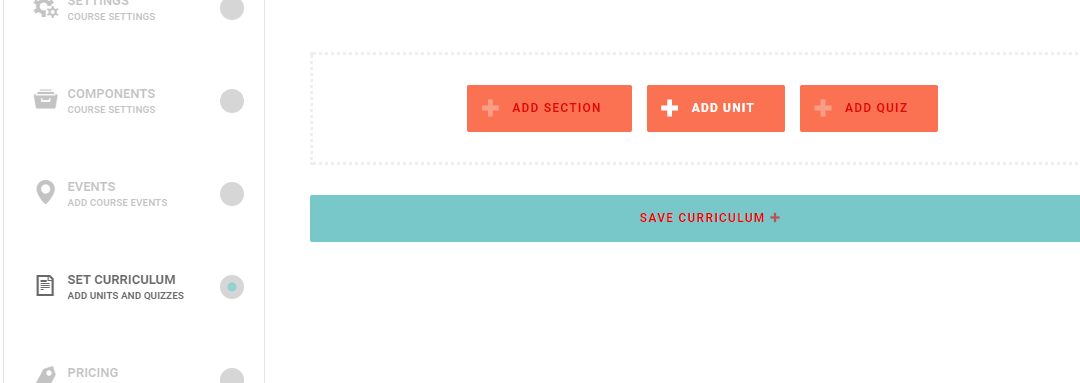
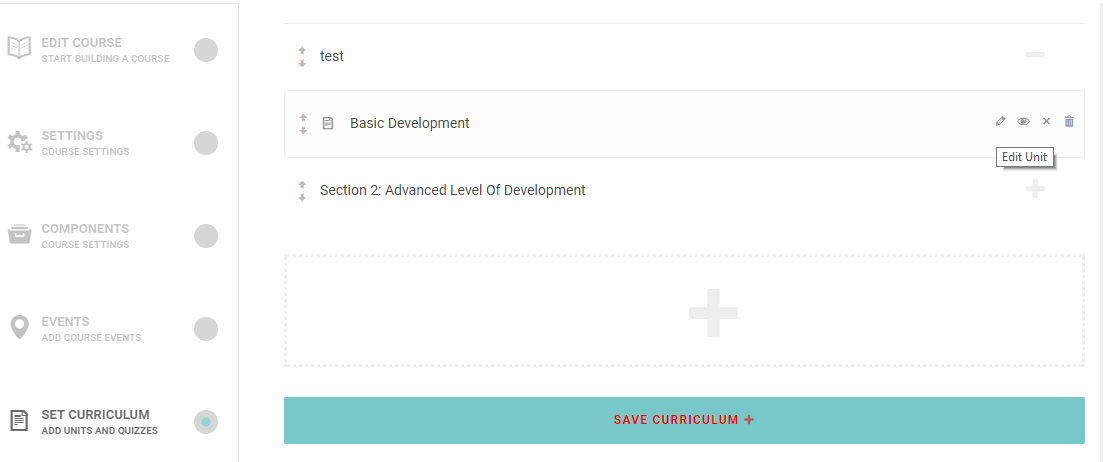
Set Curriculum
- ADD SECTION Add a new section in the curriculum. Clicking this button would add a Text box in the curriculum section. Enter the section title in the box.
- ADD UNIT Add a unit in the curriculum. Clicking this button would add a select box showing all the units. If instructor privacy is enabled then all the units created by instructor will be shown in the select box. To add a new unit select "Add New Unit" in the select box, which will show a input box. Enter the title of the unit in the input box and select Publish from the dropdown beside the unit. Once published the unit will be published and the dropdown controls will now show edit unit. Clicking on edit in the dropdown controls would take the user to the unit editing screen. Clicking on Delete would remove the unit from the databse. Clicking on remove will remove the unit form the curriculum.
- ADD QUIZ Add a Quiz in the curriculum. Clicking this button would add a select box showing all the quizzes. If instructor privacy is enabled then all the quizzes created by instructor will be shown in the select box. To add a new quiz select "Add New Quiz" in the select box, which will show a input box. Enter the title of the Quiz in the input box and select Publish from the dropdown beside the unit.Once published the quiz will be published and the dropdown controls will now show edit quiz. Clicking on edit in the dropdown controls would take the user to the quiz editing screen. Clicking on Delete would remove the quiz from the databse. Clicking on "remove" will remove the quiz form the curriculum.
- Save Curriculum Unless the Course curriculum is saved, the new units created and added are not a part of the course curriculum.
-
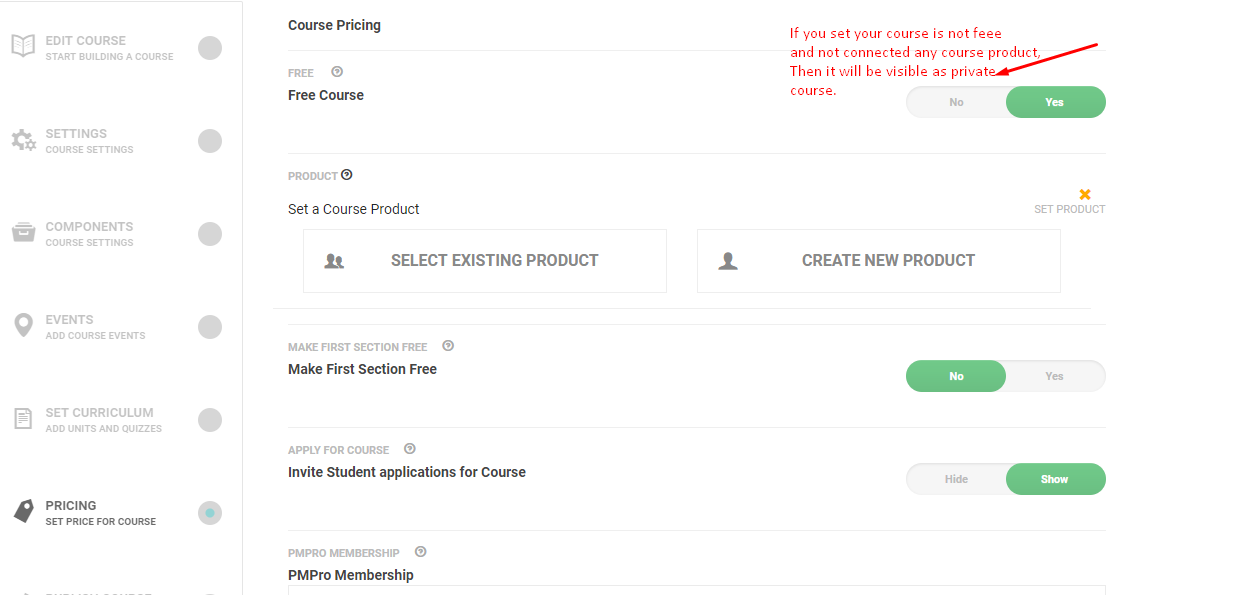
Pricing
- Free Course Set the course as Free. A free is available to all students accessing the course.
- Set a Course Product
- Select an existing product if instructor want to sell the course as a combination of courses.
- Select "No Product" to keep the course as private and manually control the Students for course
- Select "ADD NEW PRODUCT" to create a new product and set the mode and pricing. If mode is set to subscription set the duration of subscription in days. If subscription is not enabled then the subscription duration is set as course duration. When a student purchases a course the subscription duration is set for the student. The access to the course is limited by subscription duration of the course, post which the course goes into expired state and student has to re purchase a course product to continue with the course again.
-
Publish Course
Publish the course. If Administrator has given access to publish the course then the course will be published, otherwise it will go into pending state, which the administrator needs to manually check and turn the status to Published.


Editing units
Units can be edited from the Course Curriculum unit controls or directly from the Edit Page control in the WP Admin bar.
- When the unit is in edit mode, the content can be directly added in the unit using the front end interface.
- Unit settings need to be saved first before clicking on update the unit content.
- Unit settings
- Unit Type Select a unit type. This shows a symbol in the course curriculum corresponding to units.
- Make Unit Free Set a unit free. A Free unit is accessible to the world, including non-registered members and search engine bots.
- Duration of unit Set a suggestive duration of a unit. Only for display purpose.
- Connect Assignment Connect an assignment to a unit or create a new one.
- Connect a Forum Connect a forum with the unit or create a new one in the course forum.
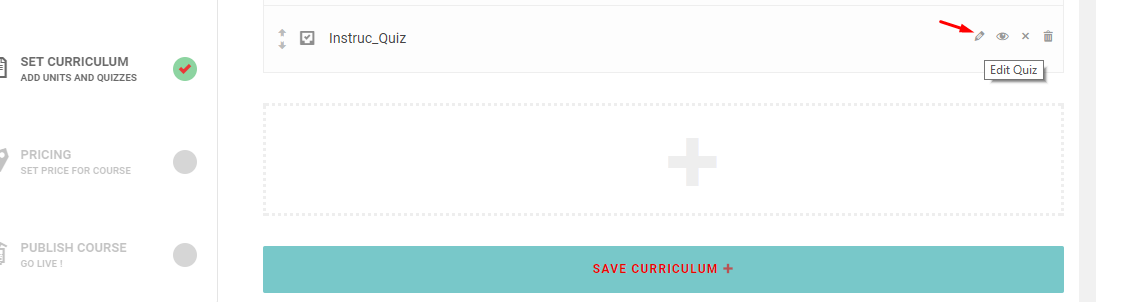
Editing Quiz
Quiz can be edited from the Course Curriculum Quiz controls or directly from the Edit Page control in the WP Admin bar.
- When the Quiz is in edit mode, the Quiz instructions content can be directly added in the unit using the front end interface.
- Quiz settings need to be saved first before clicking on update the unit content.
- Quiz settings
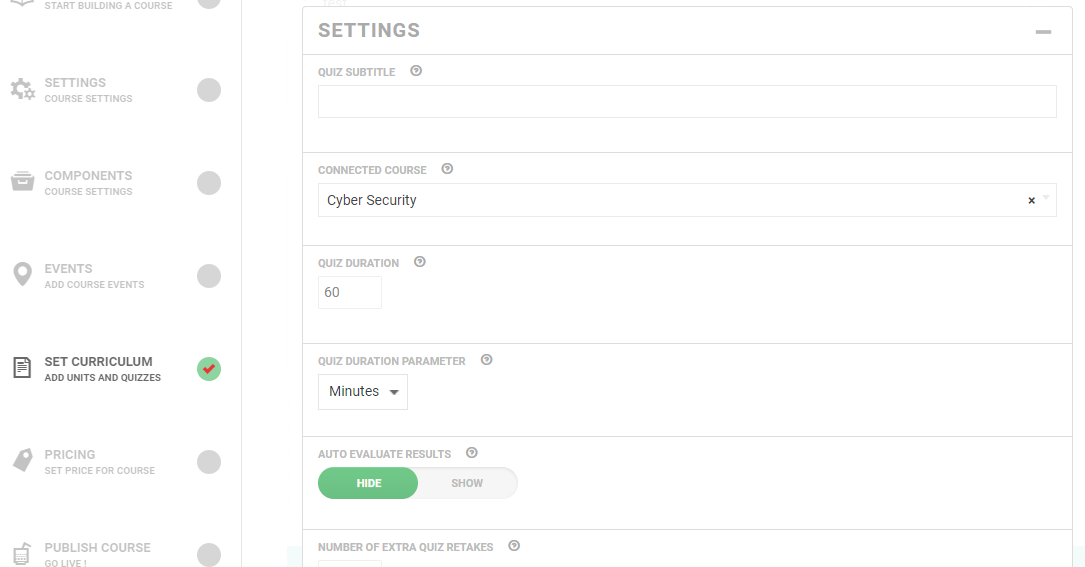
- Quiz Subtitle Enter a sub-title for quiz. This sub-title is shown below quiz title.
- Connected Course Optionally select a connected course. Once connected the quiz will show a back to course button.
- Quiz Duration Set a duration of the quiz. This duration sets the timer.
- Quiz Evaluation Set quiz evaluation mode, automatic or manual. If set to automatic make sure all question types adhere to the settings done in Options panel -> Course manager -> Auto evaluate question types.
- Quiz Retakes Set quiz re-takes this allows student to retake a quiz
- Quiz Completion message Set a completion message. This message is shown to the user when user submits the quiz.
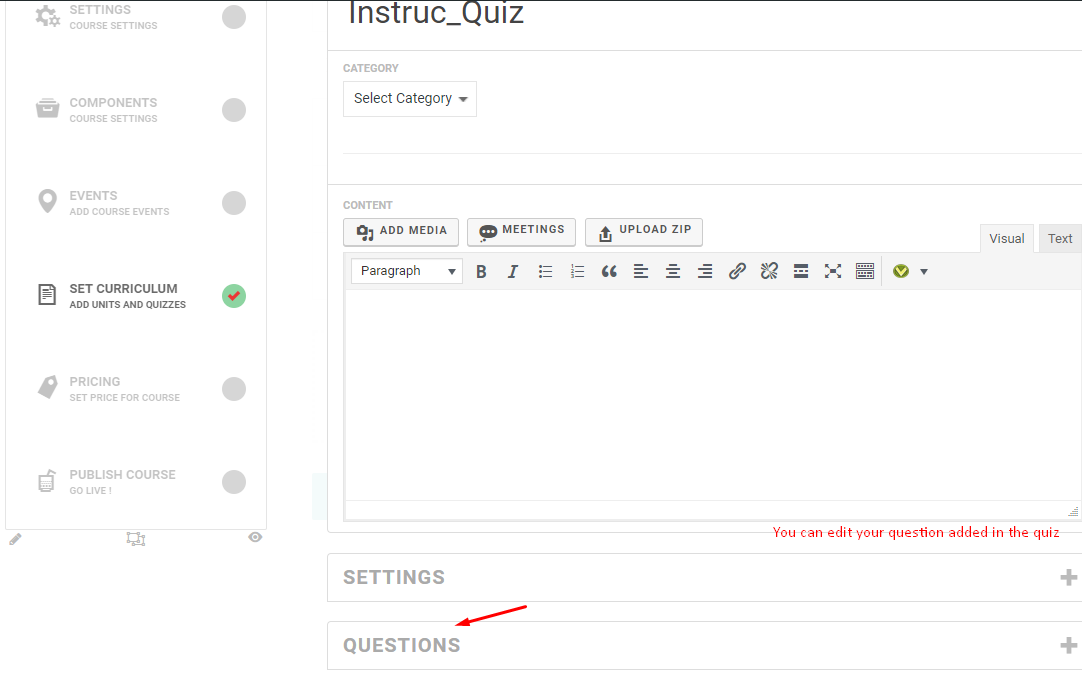
- MANAGE QUIZ QUESTIONS :Use this section to manage questions in the quiz.
- ADD Question Add Question using this button. A select box with questions will appear. If instructor privacy is enabled then all question created by instructor will be shown in the dropdown.
Editing Question
Questions can be edited from the quiz timeline or by adding ?edit in the Question link. Once a question is in edit mode, it'll show question settings.
- Question Type : Select the question type our of following option types.
- Multiple Choice Single Answer : Requies options and only one choice can be marked as answer. Correct answer is entered as a single number like 1. Or simply by clicking on the option number.
- Multiple Choice Multiple Answer : Requires options and multiple choices can be marked as answer. Correct answer is marked as multiple choice number saperated by comma as 1,2. Or simply by clicking on the option numbers.
- Sort Answers : Requires options and the order of options to be marked as answers like : 1,2,3,4
- Single line text : Does not require options, correct answer needs to be marked
- Multi Line text :
- Add Options : Clicking on this button adds a new option with text input box. The text box acts as the option holder.
- Correct Answer : The correct answer for a question. If the quiz is auto evaluation mode, it needs to be configured properly. For multiple choice question it is suggested to click on option number to fill the correct answer
Editing Assignment
Assignments can be edited from the "Edit Assignments" link in the edit unit page or directly by adding ?edit to the assignment URL. Once in edit mode, it will show following settings :
- Subtitle : Enter a assignment Subtitle.
- Assignment Maximum Marks : Enter Maximum marks for assignment.
- Assignment Duration : Assignment Duration in days. Assignment counter end automatically submits the assignment for evaluation.
- Include in Evaluation : Include this assignment in a course evaluation. If selected, marks of students in this assignment will be included in evaluation of a course. This also restricts students from viewing full assignment. Only students subscribed to the associated course can view the assignment details when they click on start assignment button and the timer starts.
- Assignment Course : Select a course to which the assignment should be connected. Only applicable if Include in Evaluation is set to yes.
- Submission type : Select submission type from Upload or Textarea.
- Attachment type : Select allowed Attachment types, if submission type is set to upload.
Managing Course
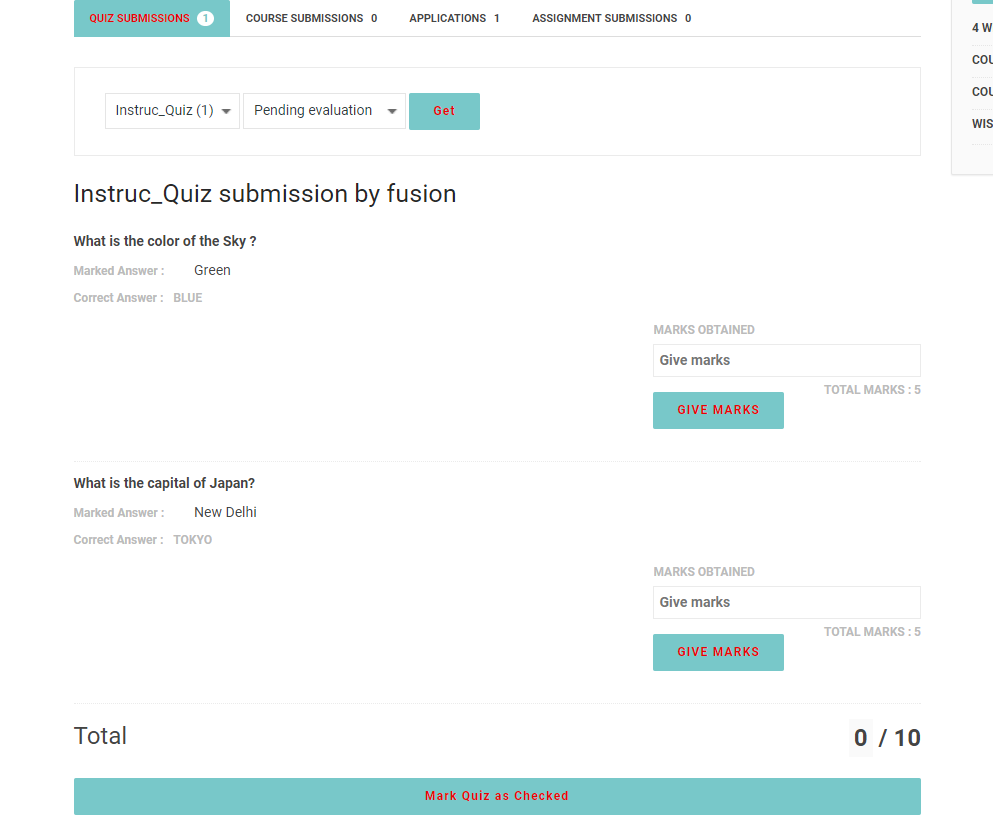
Evaluate Quiz
After creating courses Instructor manages the courses. There are various function available to manage courses in the Theme. A course is Managed from the Admin section in Course page.
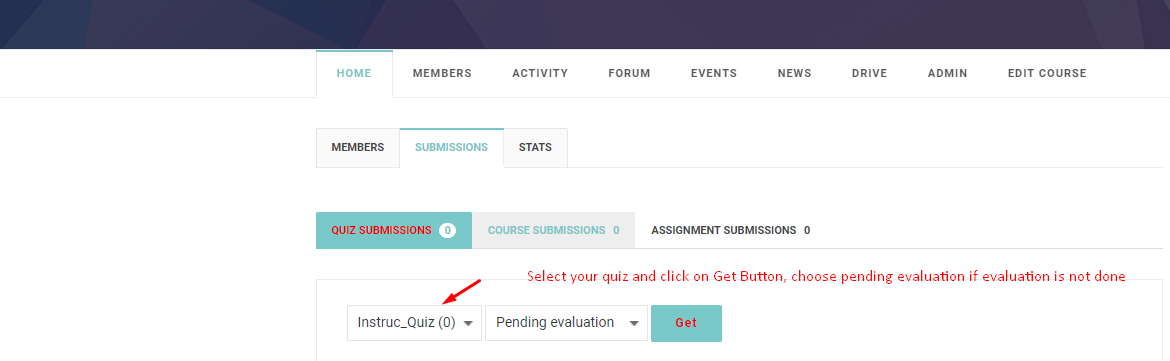
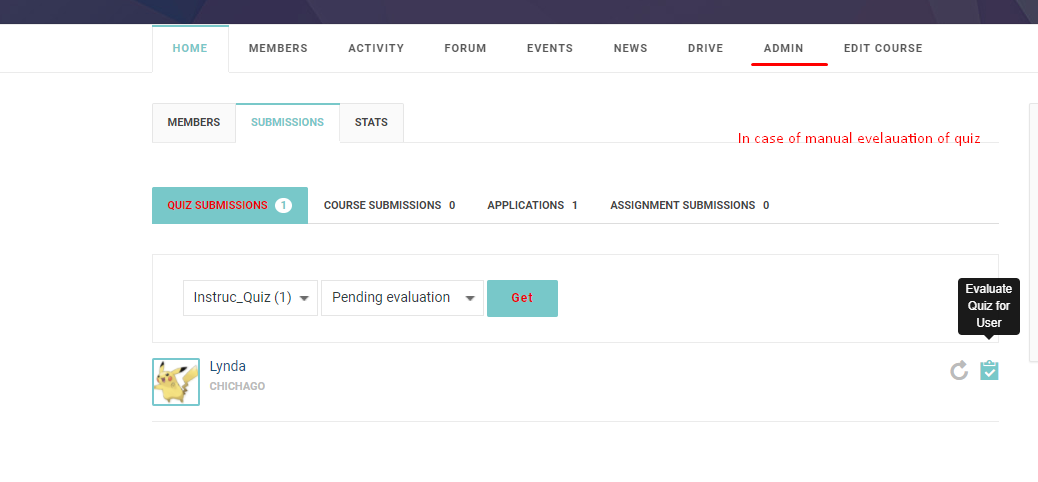
- After the Student has submitted the quiz.
- The Quiz submissions can be loacted in the Course Admin -> Submissions -> Quiz Submissions section.
- If for any reason the Instructor needs to reset the quiz for the user then she can click the Reset Quiz for User option
- To Evaluate the quiz, Instructor clicks on Evaluate icon and the Evaluation screen opens
- Evaluation screen shows, Question , marked answer, correct answer , maximum marks for the question and a textbox for marks and give marks button.
- To give marks to each question Instructor enters marks in the textbox and clicks save marks.
- Once Instructor has saved marks for all the questions, Instructor can click on Mark quiz as evaluated
- As soon as this button is pressed the user gets a notification and message with the Quiz Results.
An instructor can also allow students to instantly check answers. Here is the tutorial : Instantly check answer
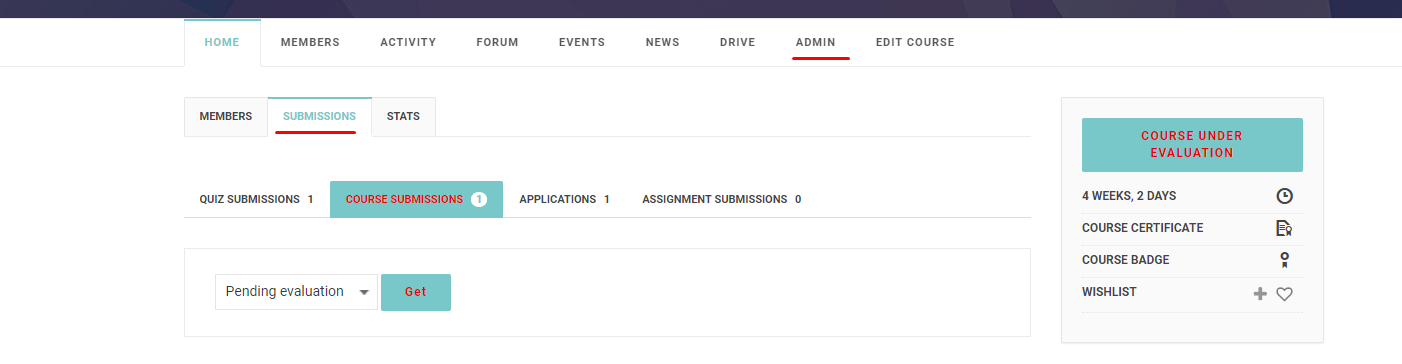
Evaluate Course
- After the Student has submitted the Course.
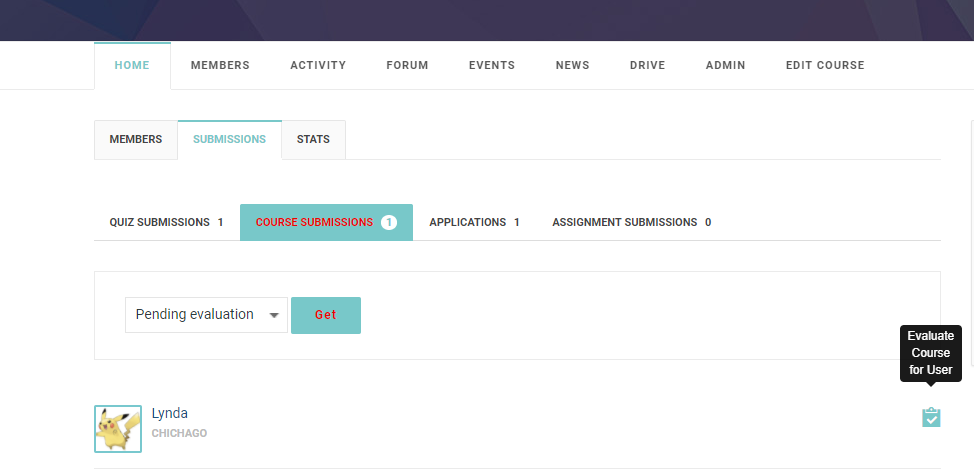
- The Course submissions can be loacted in the Course Admin -> Submissions -> Course Submissions section.
- If for any reason the Instructor needs to reset the course for the user then she can click the Reset Course for User option.
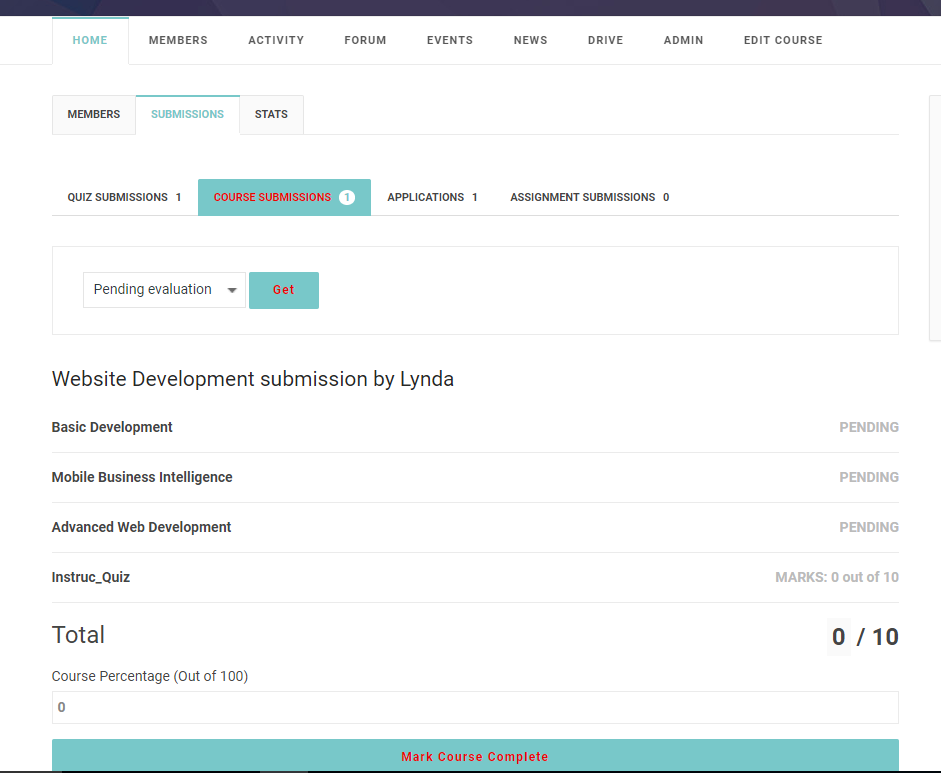
- To Evaluate the course, Instructor clicks on Evaluate icon and the Evaluation screen opens.
- Evaluation screen shows, the all the units in the course, and their completion status, it also shows the marks obtained in the Quizes in the course.
- To give marks to Instructor enters marks from 100 in the marks column and marks Course as evaluated.
- As soon as this button is pressed the user gets a notification and message with the Course Results. If the Course percentage is above Badge percentage then the user recieves a Badge, if the Course percentage is above the passing percentage then the user recieves a completion certificate.
Managing Students
- An Instructor can reset the full course for any student. This will have to start the course again from the very begining. This can be done form the Course -> Admin screen.
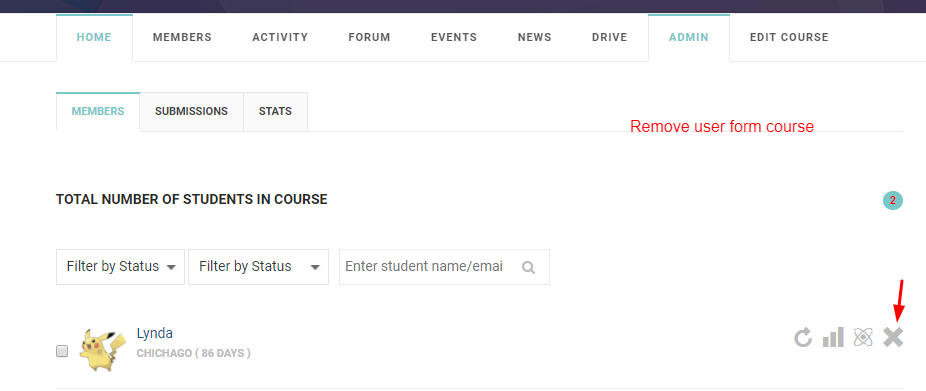
- An Instructor can remove any student from the Course. The student will have to Purchase the course again to take the course. This can be done form the Course -> Admin screen.

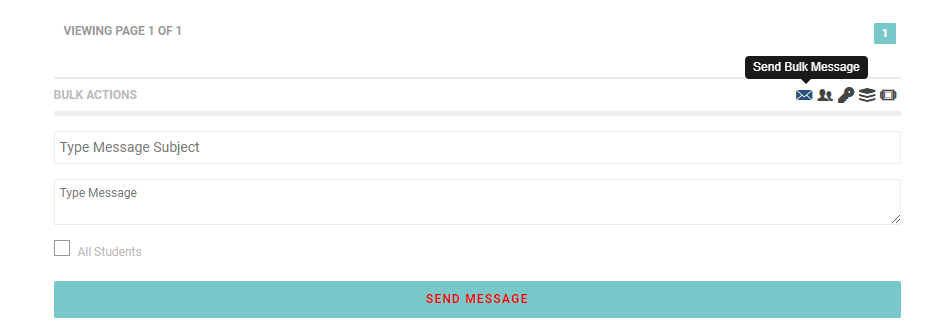
Course Messaging
An Instructor can send mass message to the students taking the course.This can be done form the Course -> Admin -> Members screen.
Course Admin
Course Administrator is a person who created the course. It may be the instructor also. From course admin area, an admin can perform various tasks for a particular user or for all users by marking the checkbox of that user. Course Admin Section is categorized into three subsections.
- Members : Through this section, an administrator can reset course for users, see course statistics for user, see user activity in course, can remove user from that course, send bulk messages, add students to course, assign badges/certificates to student, extend subscriptions for an user, change course status.
- Assign : An administrator can assign and remove course certificates and course badges to student's profile from this section.
- Extend Subscription : An administrator can increase or decrease the no. of days of subscription from this section.
- Send Bulk Message : An administrator can send messages to All students or to selected students from this section.
- Add Student to Course : An administrator can add new students in this course from this section.
- Change Course Status : An administrator can change the status of that course for students from this section. Path :Go to All Courses > Course > Edit Course > Admin > Members
- Submissionss : Through this section, an administrator can get all the submissions done by user such as quiz submission, course submission, assignment submission etc. An administrator can reset a particular submission(course, quiz, assignment) for a particular student as well as evaluate those submissions.
- Stats : An administrator can view the statistics of the students who enrolled in that course such as average marks obtained by students, number of passed students, number of students who got a badge.
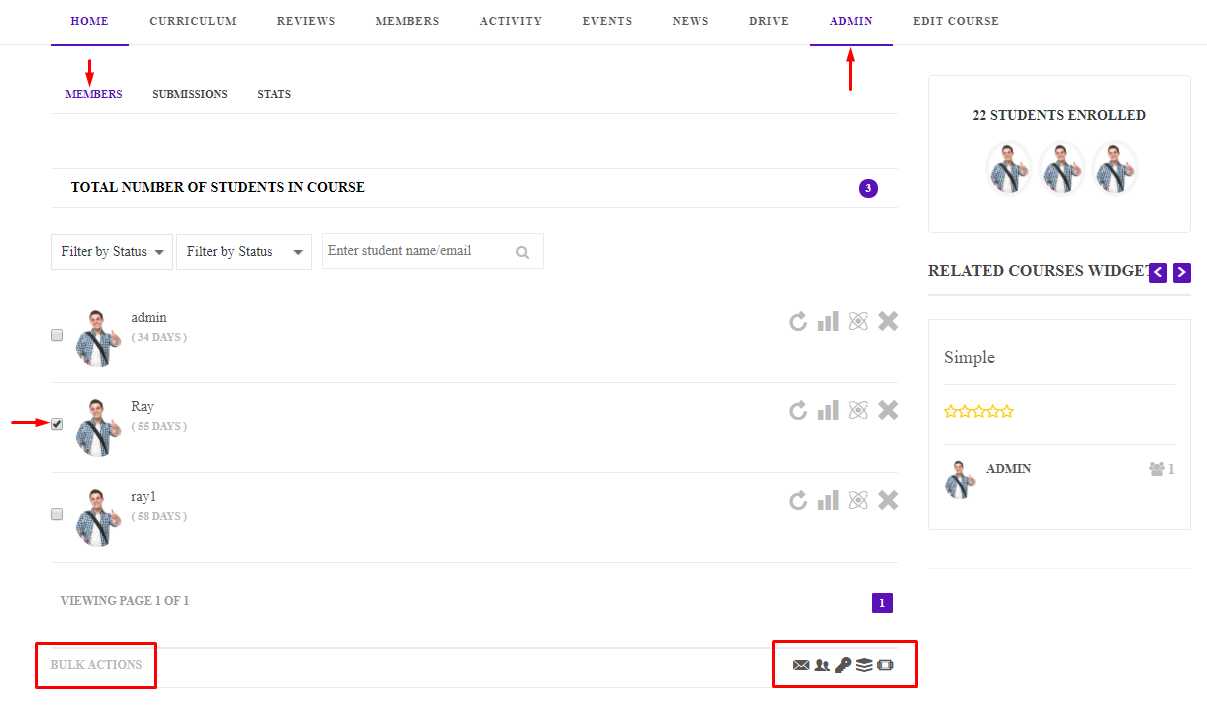
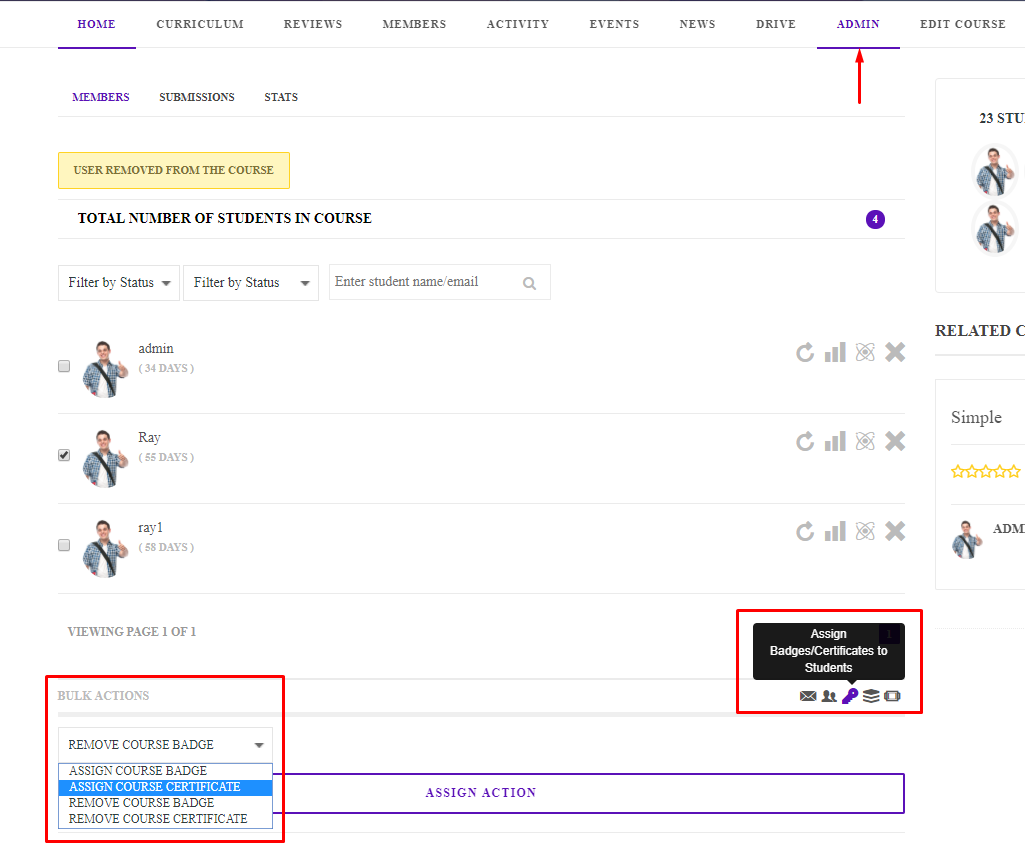
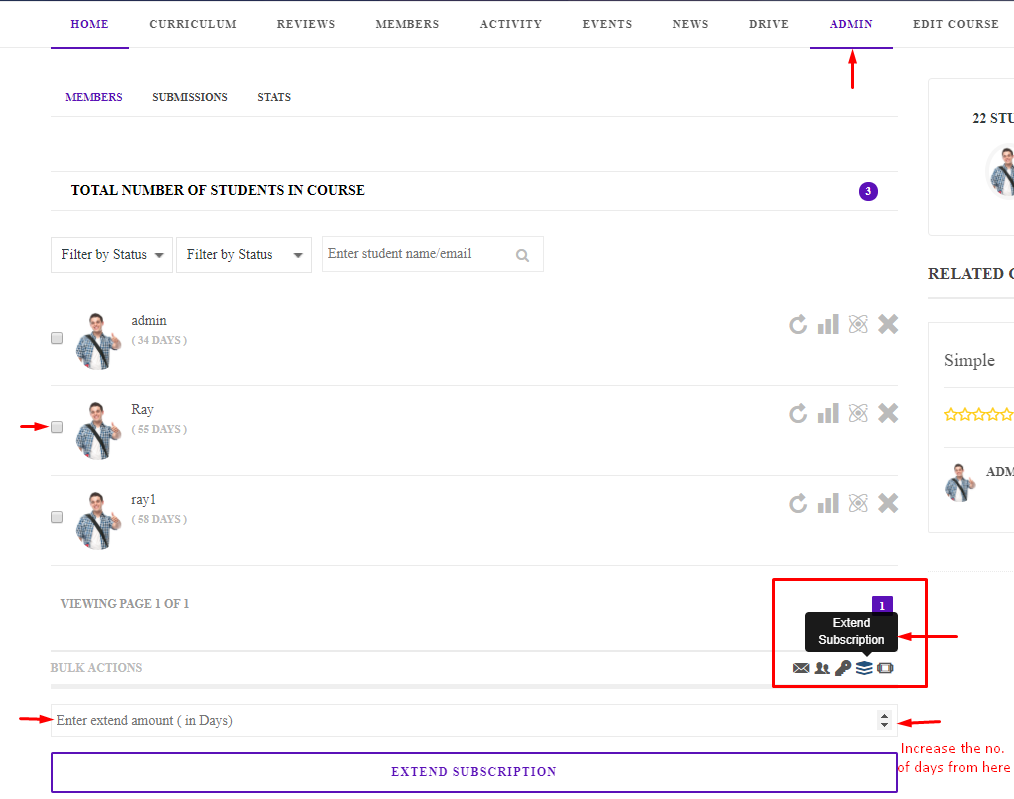
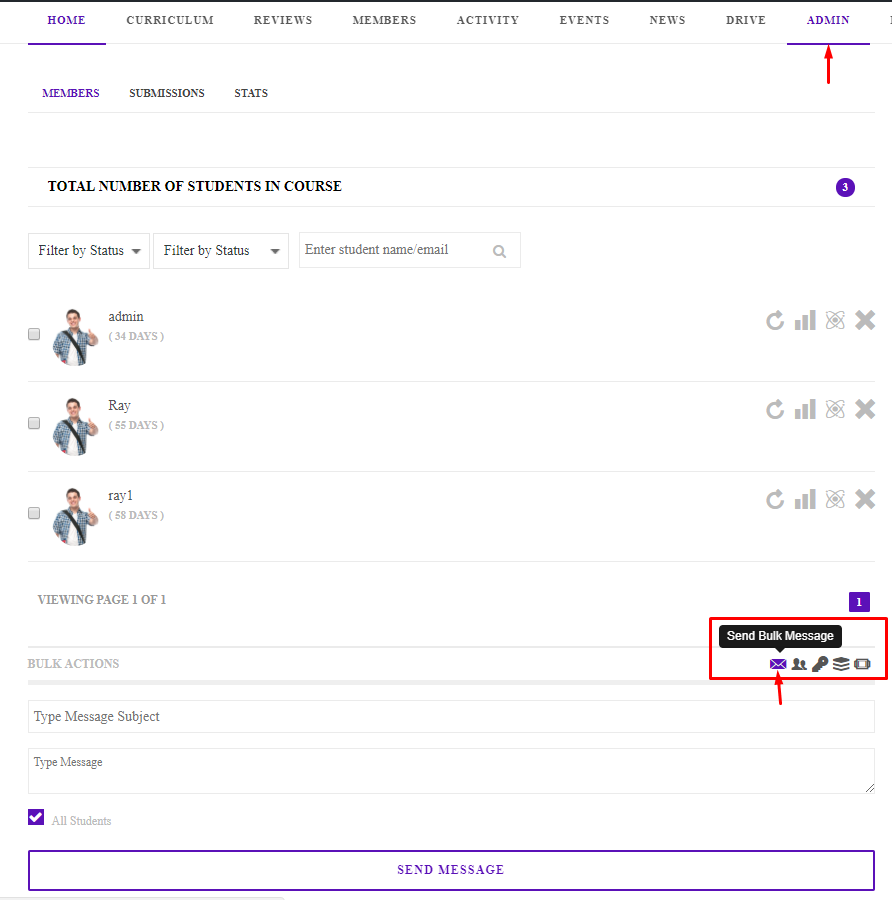
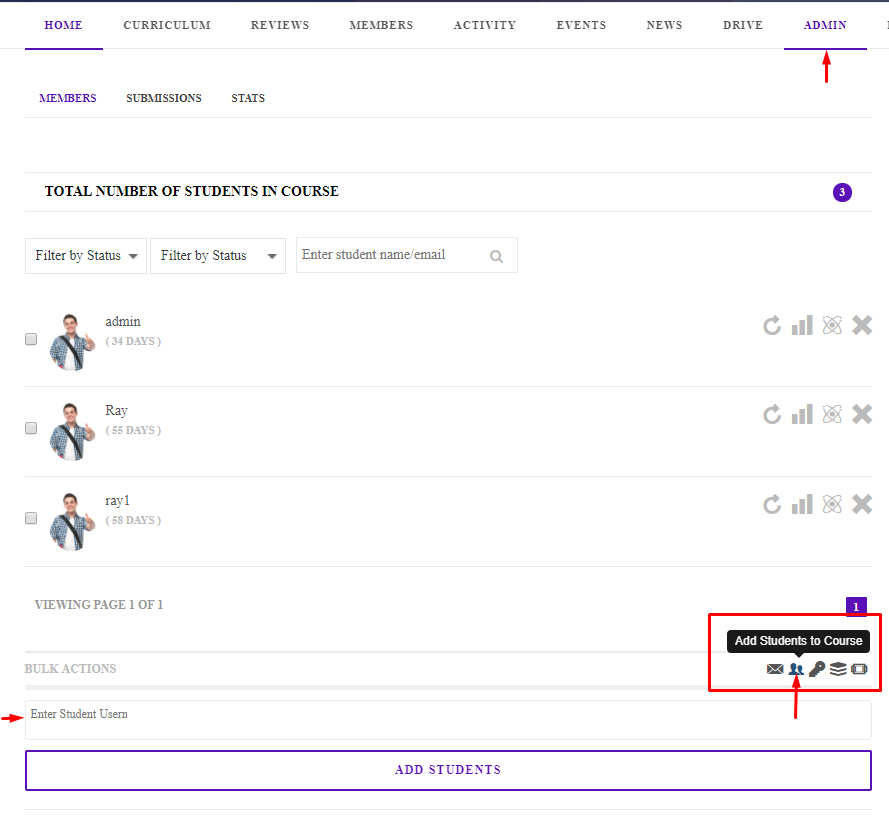
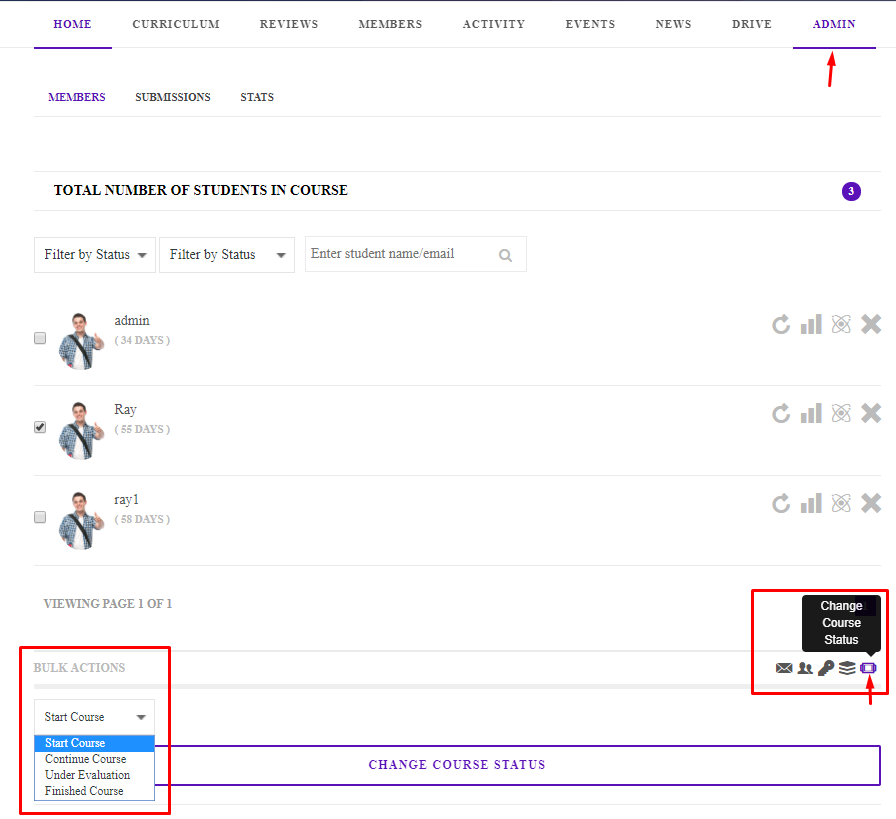
Add Students To course From course admin : Tutorial
Show Students Progress in Course Admin Area : Tutorial
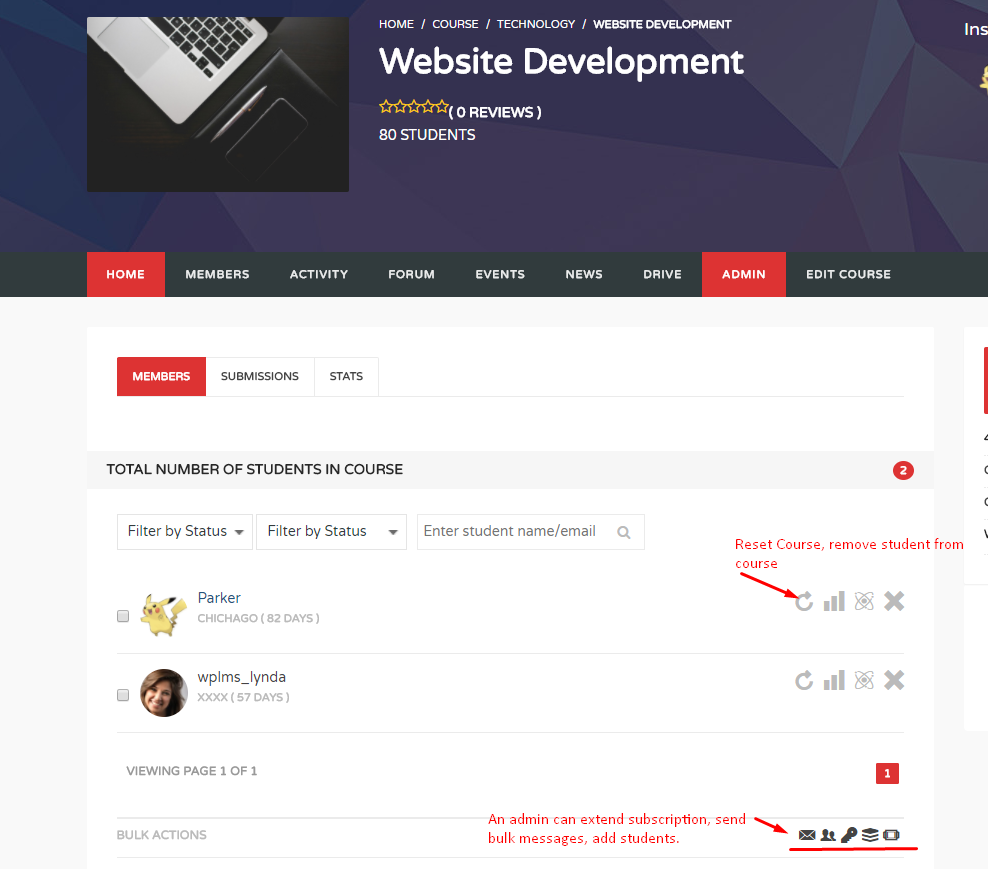
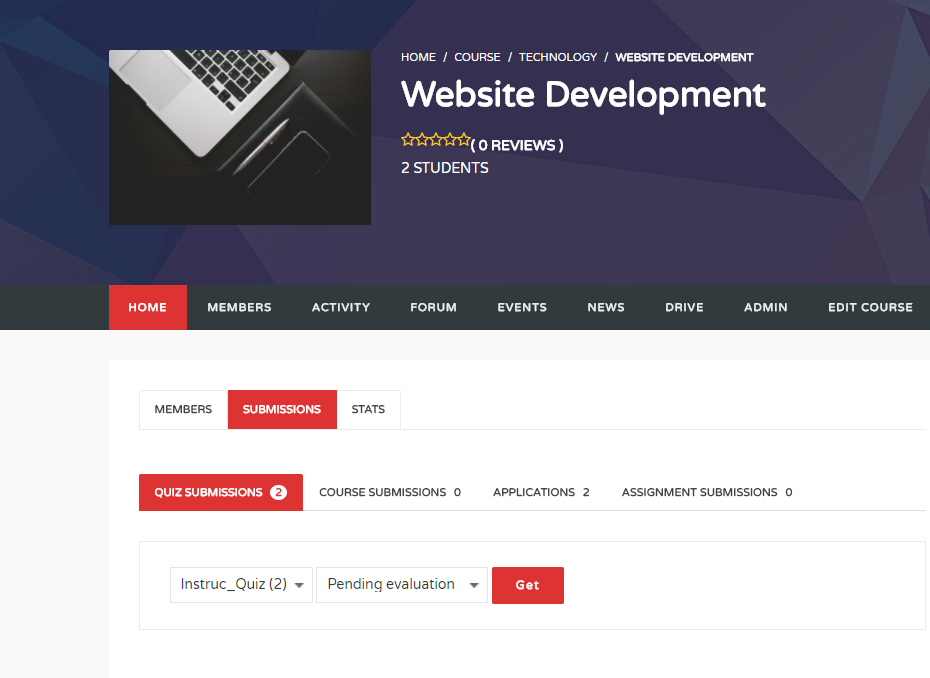
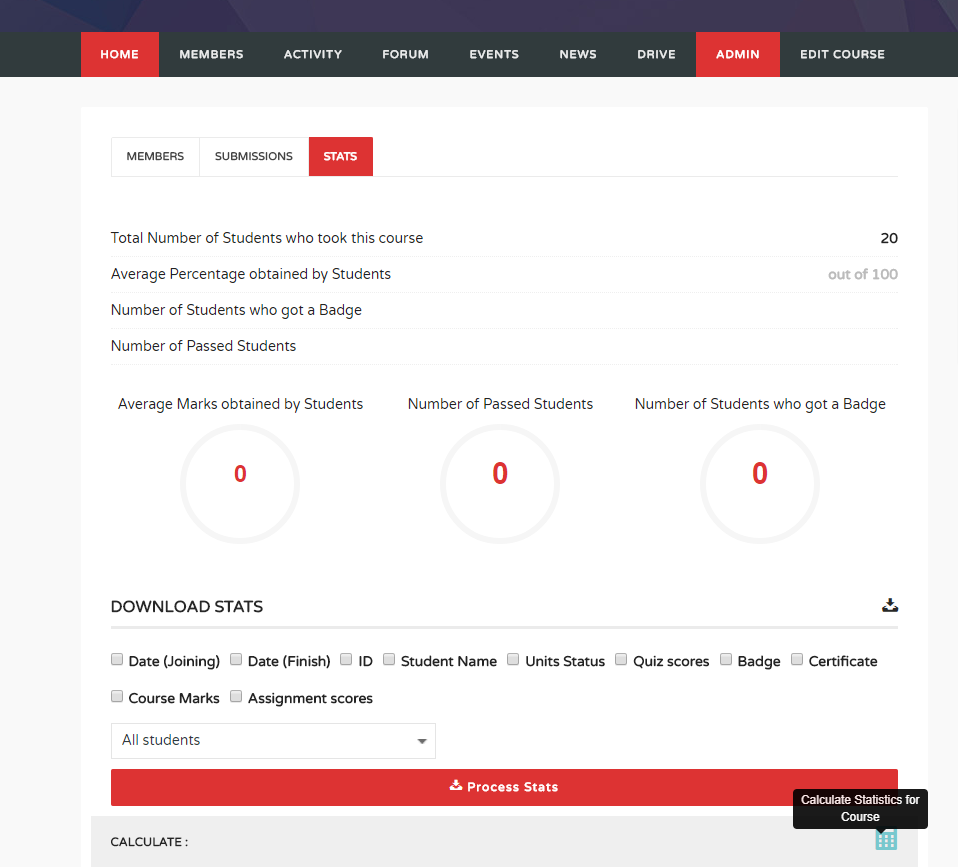
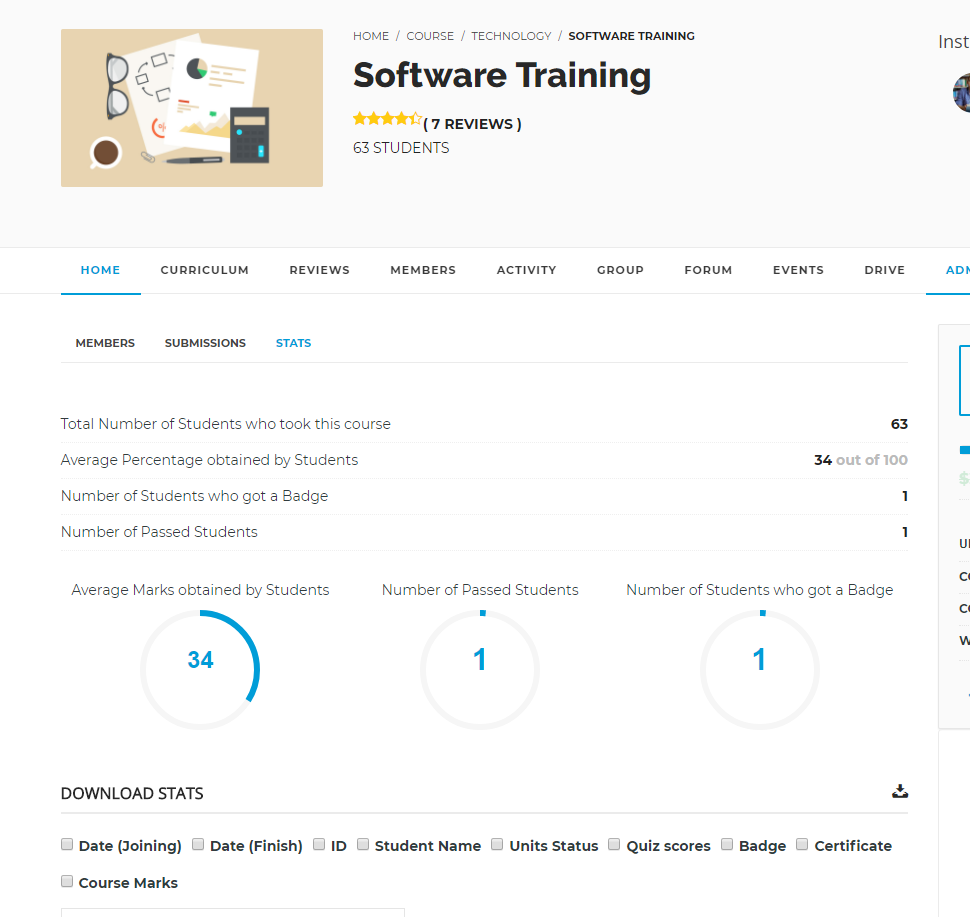
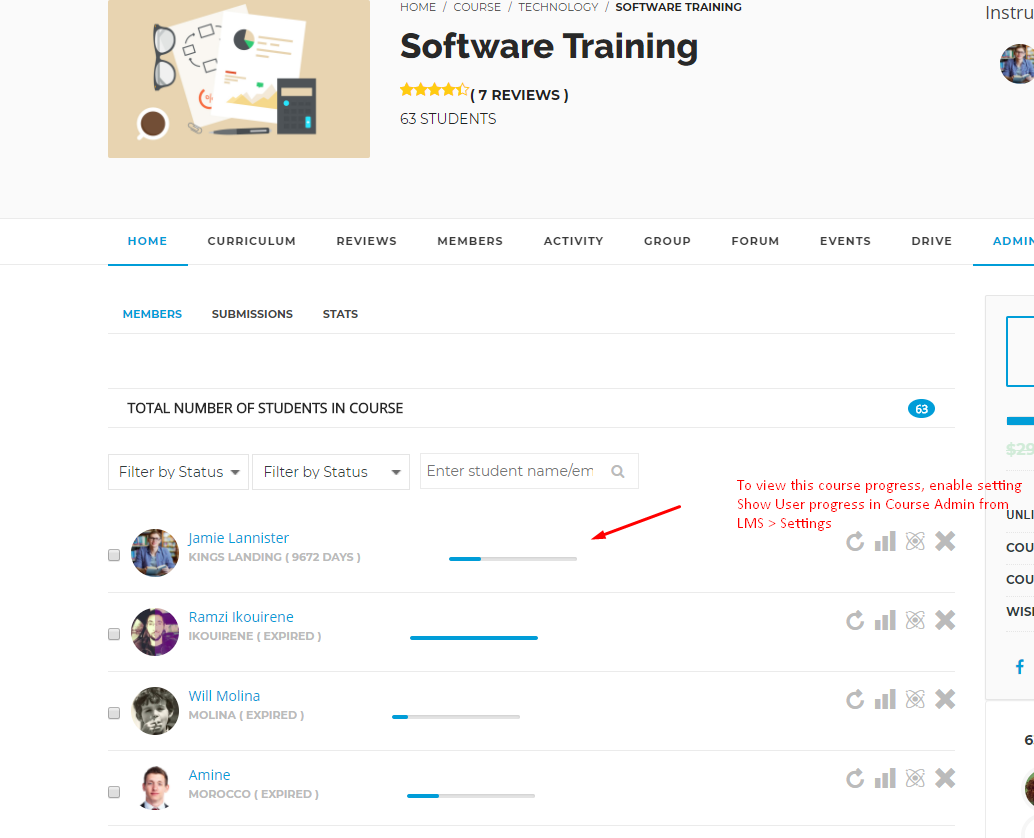
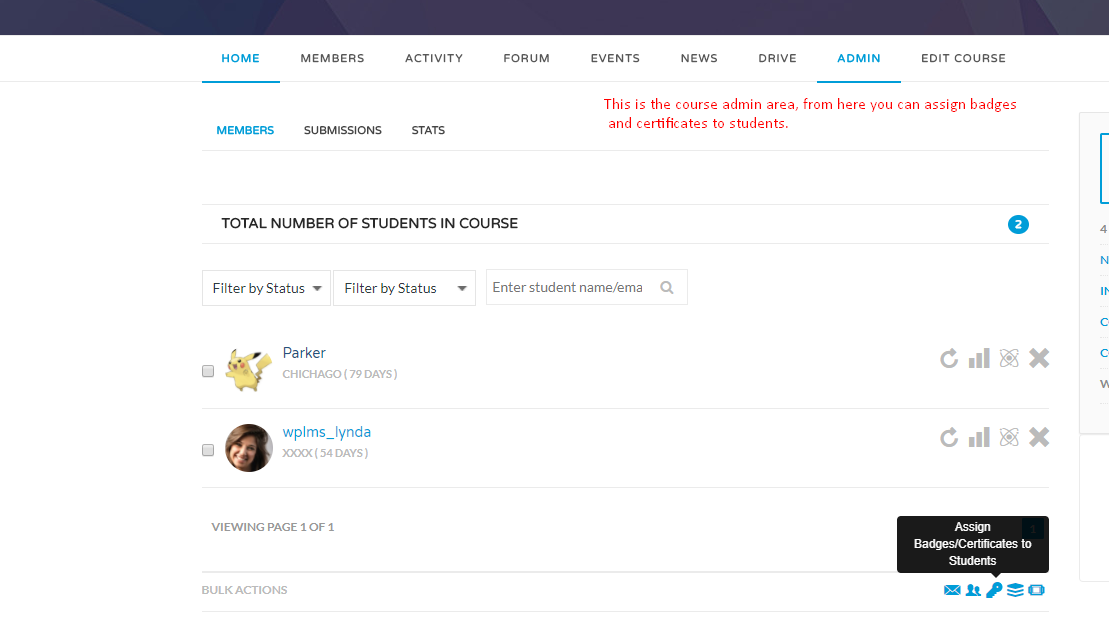
Administrator Statistics
Administrator statistics is present in the WP Admin panel -> LMS -> Statistics section. This area of Statistics is only accessible to Administrator. The Stats section comprises of 6 further subsections as follows.
-
Overview :
- Overview comprises of graphical representation of number students starting new courses in the WPLMS.
- Overview shows critical information about the LMS as total number of students, total number of instructors,total number of Courses taken by students, total number of Badges awarded to students and total number of certificates awared to students.
- The graph depicts a growth chart of number of students entering and starting the courses in the site.
- The graph can also be set from a daily graph to a monthly graph to a custom date graph to check the growth levels in particular duration in WPLMS.
-
Courses : All the vital information regarding courses can be seen in this section. Each course with Number of students in it, number of certificated awared in this course, number of badges awarded in this course and the average score of students in this course.
- Total number of students taking courses.
- Total number of students who have started a course.
- Total number of courses finished by students.
- Total number of units in courses completed by students.
- Total number of quizes finished by students.
-
Instructors : All the vital information regarding Instructors can be seen in this section. Each Instructor with Number of Courses, number of certificated awared by instructor, number of badges awarded by instructor and the average score of students in this Instructor's course and total number of students in this Instructors courses.
- Total number of courses taught by instructor.
- Total number of students taking instructor's courses.
- Total number of badges awarded by Instructor.
- Total number of certificates awarded by Instructor.
- Average score of Students in courses by Instructor
-
Students : All the vital information regarding students can be seen in this section. Each student with Number of Courses, with their scores and their averages is visible in this section.
- Total number of students.
- Total active students.
- Total number of course students.
- Download Stats : From here you can download stats reports of the selected module. Select the module and then click on "Generate Report" Button.
-
Assignments : All the vital information regarding assignments can be seen in this section.
- Total number of Assignments
- Total number of Assignments submission by student
- Total number of submissions of a particular assignment.
- Average Percentage of the Assignment
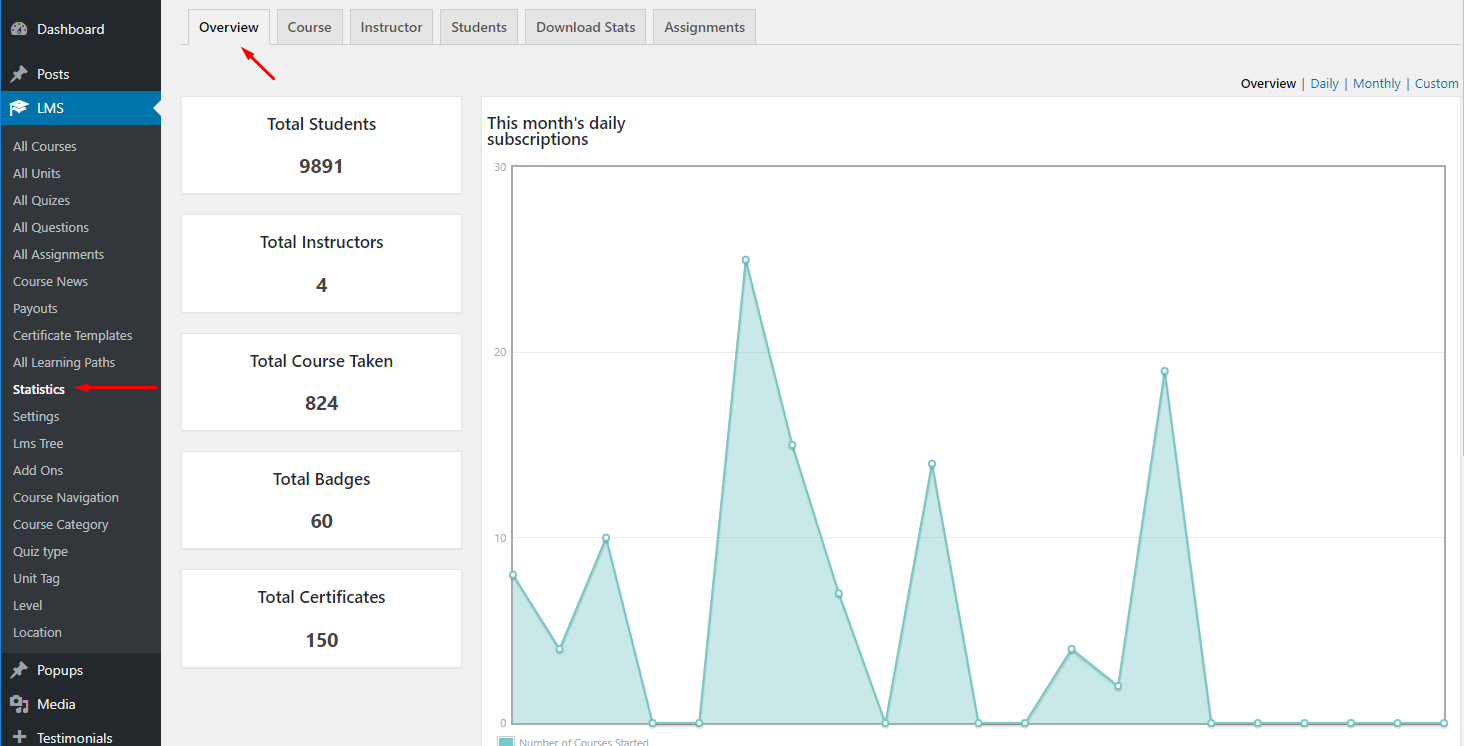
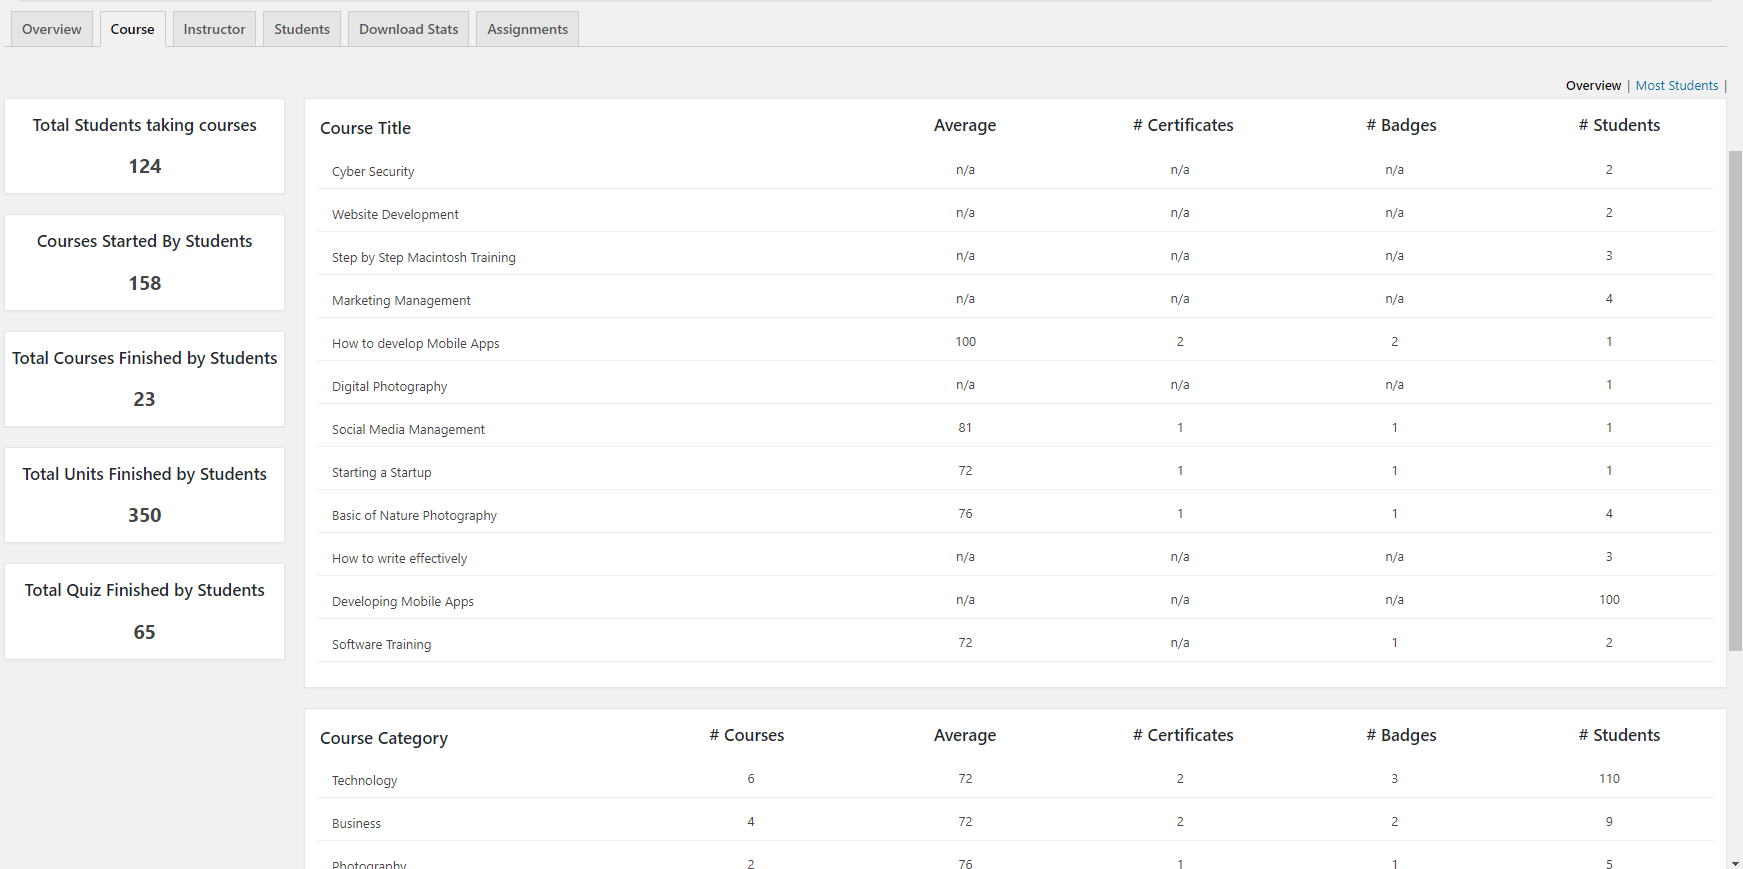
Interaction
BuddyPress offers a variety of components to promote interaction among students and instructors. BuddyPress is set up as a plugin that can be added to a WordPress site. It’s a large plugin, and it adds a lot of functionality. Users can create and update their profiles, send private messages to one another, befriend and de-friend each other, form and join groups, participate in forum discussions, and more. To enable buddpress settings, Go to WP-Admin > Settings > BuddyPress > ComponentsThere are some core features which are discussed below:
Extended Profiles
Users can update their profiles from their profile section. They can update their profile photo, update or change their cover image, update about your location and bio.
Activity Streams
Activity streams aggregate all of your activities across a BuddyPress installation. Enabled BuddyPress components make use of the activity stream component, which means any sort of activity can be recorded. Blogs posts, new friendships and blog comments are among the most popular activities recorded.
Private Messaging
Private messaging allows greater interaction among students.Members can message other people on their friends list as well as reply to received messages. Each member has their own individual Inbox and Sent messages folders as well as a Compose message screen. Members are notified of new messages in three ways:
- By email (if enabled by the user)
- By an incremented number in the notification circle located in the WP Admin Toolbar
- By an incremented number in the Messages tab if the user is on their own profile
Quiz and Course results are sent to users via private messaging, wherein students can directly interact with their instructor on the results.
Groups
Every Course taker is added to the course group. There are many useful plugins which can be installed to increase the usability of Groups in LMS. The plugin Group documents enables the Instructor to upload documents, like assignments for the Course group. This is automatically sent to the full course group.
Forums
With the forum WPLMS get a lot of interaction features. A Private forum conencted to the Group can be made as the Course forum. This makes the Forum an exclusive club for the Course Members.
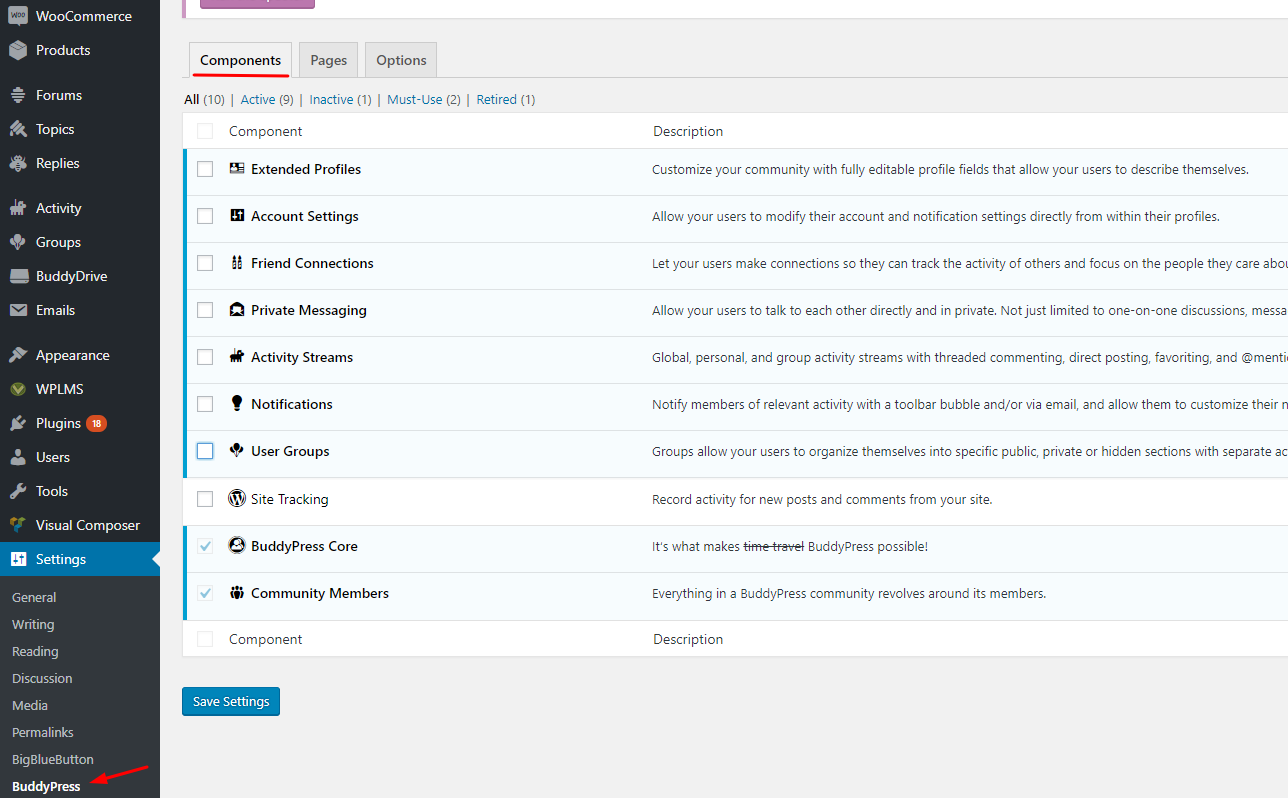
BuddyPress Email Migration
There are two email templates present in theme. One is for wplms messages and another one is for buddypress. So it is recommended by wplms theme that all emails templates should be imported to buddypress templates. Buddypress email templates are customizable and it can be customized from wp-admin > Emails > Customize. Through this setting, you can customize your email template according to your own need. These templates can be translated also using Loco Translate Plugin.
WPLMS Email Migration : Tutorial
Migrate All the WPLMS Mail to BuddyPress Again : Tutorial

Video Tutorial
Manage Student Course Status
Instructor view Student Results
Assignment Creation & User Flow
Like WPLMS ?
Rate us at Themeforest
Every rating counts and helps us to improve WPLMS. How to rate WPLMS ?
Not Happy ?
Send us an email at vibethemes@gmail.com and share feedback.